Admin
- Documents
- Overview
- Update existing document
- Create new document
- Delete document
- Manage create and duplicate functionalities
- Document types
- Stock transactions
- Scheduled jobs
- Overview
- Create scheduled job
- Update existing scheduled job
- Delete scheduled job
- Run a scheduled job manually
- Custom actions scheduled job
- Model sync settings
- Event actions
- System options
- Rebook matrix
- Promo and Work Equipment
- Requirements
- Receive new MO order
- Request promo
- Request missing work equipment
- Reservation and rebook
- Pickup products
- Print signers
- Custom models
- Custom fields
- Workflows
Documents
Overview
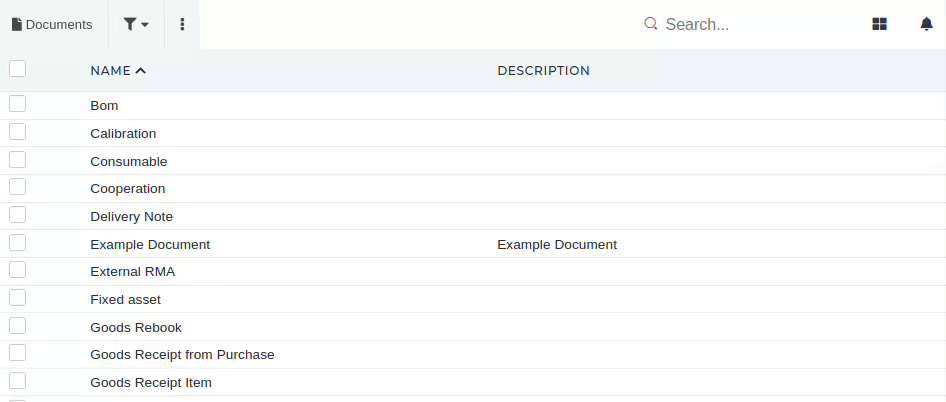
The documents page lists all ERP sections, currently used in the ERP. Users cannot add any new document entries or export a generated excel file.
Users with proper permissions can edit existing documents, but adding new documents is not available.

Update existing document
This action requires the "update documents" permission.
On the edit page, document's name and description can be edited, while the table name is not.

Users can add new and remove existing document types and edit the document type's description and numbering format, which defines the document number format (eg. SE-%5N-%YYYY -> SE-00001-2024 ).
Users an also add, edit or remove status categories and define category's default name, background color and font style.

Create new document
To add a new document into the ERP, contact your ERP's administrator.
Delete document
This action requires the "delete document" permission.
To delete a document, select it with the checkbox. Once the "trash" icon appears, click it and confirm the deletion. Tee document will then be deleted.
Be careful, while deleting documents, as currently, adding documents is not supported for users.
Manage create and duplicate functionalities
This action requires the "update documents" permission.
On the document's page, it is possible to define "rules", that determine what values are written into what fields. (eg. a date field is, by default, set to today's date on the 'create' form).
Create
Defined in the "Create rules" field.
- Here, you can define what values fields are given, when the "create" form is loaded
- eg. the date fields (date_vat, date_paid...) can be set to have the default value of "new_date" when the form loads.

At current, the rules need to be defined in the JSON format: { "field_name": "field_value" }.
Update
Defined in the "Duplicate rules" field.
- The duplicate rules are used, when duplicating a row (eg. products, serials...).
- These rules define which values are copied from the "original" into the "duplicate" form.

At current, the rules need to be defined in the JSON format: { "fields": [ {"field_name": "field_value"},... ]}
Document types
Overview
Document types are used in the ERP, to tell apart documents with different purposes, for example Sale orders and Calibration orders ( Both are orders, but of different types ). Document types are always connected to the document, whose sub-type they are.

Users with proper permissions can add new and edit existing document types. Document types can also be exported into an excel file.
Create new document type
This action requires the "create document type" permission.
Creating a new document type requires no special procedures. When on document types' table view, click the "Add new" button to open the "Add new form".

While filling out the form, select a document to which this document type belongs. After adding it's name, you have to write a formula, that will be used to generate document numbers for this document type.
Adding a generator formula is important, because the formula defines the structure of a document type's document number.
In this example, the formula is NEW-QUOTE-%5N-%YYYY, which will generate document numbers, structured as NEW-QUOTE-00001-2024.
NEW-QUOTE- is the prefix that is always the same for all instances of the document type.
%5N is markdown, that defines this as 5 numbers, starting from 00001 up to 99999.
%YYYY is markdown, that defines the date, formatted as year, eg. 2024.
The document number prefix should always be unique to the document type in order to avoid confusion. These prefixes are also useful for quickly discerning a document's type.

To begin using it, just toggle the "Enabled" switch to Yes, ans save the new document type.
Update existing document types
This action requires the "update document type" permission.
When updating a document type, all information, with the exception of the generator formula, can be changed.
The generator formula must not be changed without consult. If a different document number is required, a new document type with the proper generator formula should be created.

t
Delete document types
For deletion of existing document types, contact your ERP's administrator.
Stock transactions
Overview
Stock transactions are automatically generated data entries, used for tracking stock of materials, products, serials and other goods within the ERP system.
These entries are created automatically, when an action involving any kind of stock change is performed. This includes, among others, goods receipts, goods transfers and goods write-offs.
Because these entries are created through automation within the system, they cannot be created, edited or deleted by users.

Users can export or print stock transaction entries.
Scheduled jobs
Overview
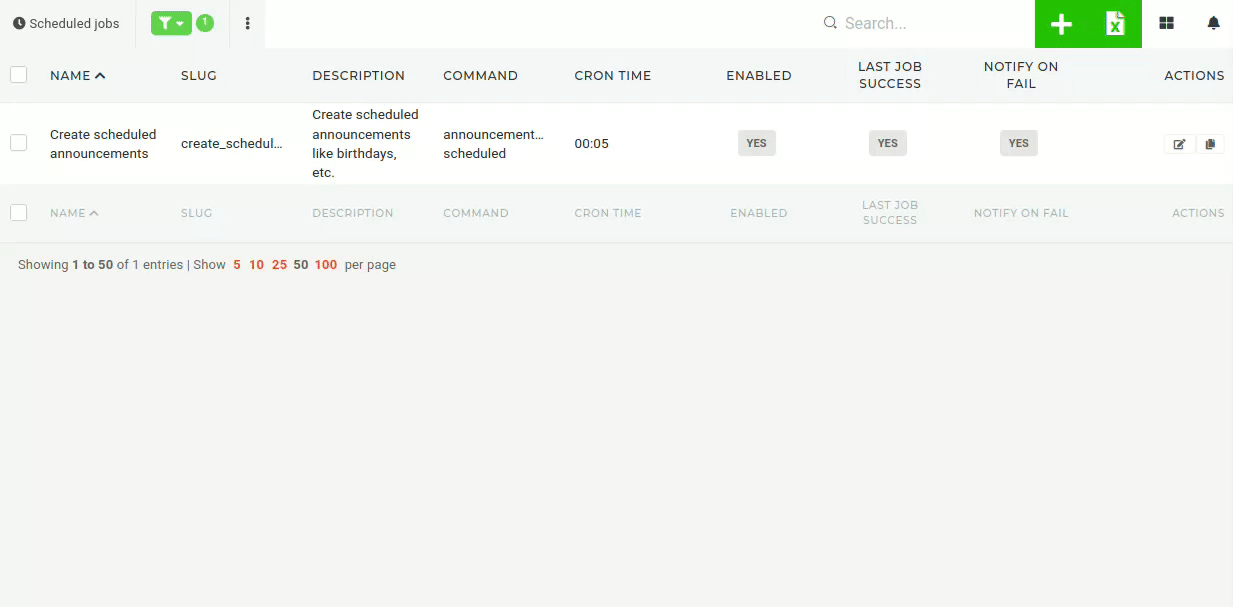
Scheduled jobs are automated tasks, performed by the system through server commands. These "jobs" can be scheduled to run at specific intervals (hourly, daily, weekly, monthly...), but can be also be ran manually through the ERP system.
Scheduled jobs are tasks, that the system can perform on it's own, such as creating announcements, indexing data...

Create scheduled job
This task should be done only by developer administrators.
To create a new scheduled job, you must click on the "+" icon on the top right corner. You will be redirected to the "Create new scheduled job form"
Scheduled jobs are commands, that are run in the server's command line. Since only administrators with access to the code base can see all available commands, scheduled jobs should be added only by those users.

Once a unique name and job's corresponding command are inputted, the "Cron inverval" must be defined. This attribute defines the job's regular schedule (when it will run). A job can be run on intervals, ranging from every few minutes to running once a year.
The "Last job success" attribute does not need to be set when creating a new scheduled job. This attribute is updated every time the scheduled job runs and shows, if the last run of the scheduled job was successful.
A job has to be enabled to run on it's regular intervals. If we want to notify the development team of a failed scheduled job, we must enable the "Notify on fail" option.
Command parameters
You can pass parameters to any commands with space delimiter. This parameter (argument) will be used in both, a scheduled or on-demand run. Example, where we pass callClass parameter in the command field:
scheduled-job:run-action callClass=App\Containers\ExternalApplication\Actions\BusinessCentral\SyncExpenseEventsFromBcAction
Update existing scheduled job
Existing scheduled jobs should only be updated by users with access to the code base.

Viable updates for scheduled jobs are changing description, enabling/disabling the job, it's email notification on failed run, or changing the "Cron interval", that specifies when the job runs.
Delete scheduled job
Scheduled jobs should ONLY be deleted by administrators with access to the code base.
If a scheduled job is no longer needed, rather than deleting it, disable it, leaving a chance for it to be reactivated if ever needed.
Run a scheduled job manually
Some scheduled jobs can be run manually from the ERP, if a need for that ever arises. Manual runs should not be the norm, as scheduled jobs are configured to auto-run atregular intervals.
To run a scheduled job, go to scheduled job's edit page and look for the "Run scheduled job now" button in the top right corner of the page.

On clicking it, the scheduled job will perform a manual run. Once the manual run is completed, it will be displayed on the list of last 30 runs logs with the message "on demand run".

Custom actions scheduled job
Scheduled jobs can invoke on existing commands from inside of ERP code.
To fix this there is a command, that receives a parameter called "callClass", that can call any Action or Task in ERP.
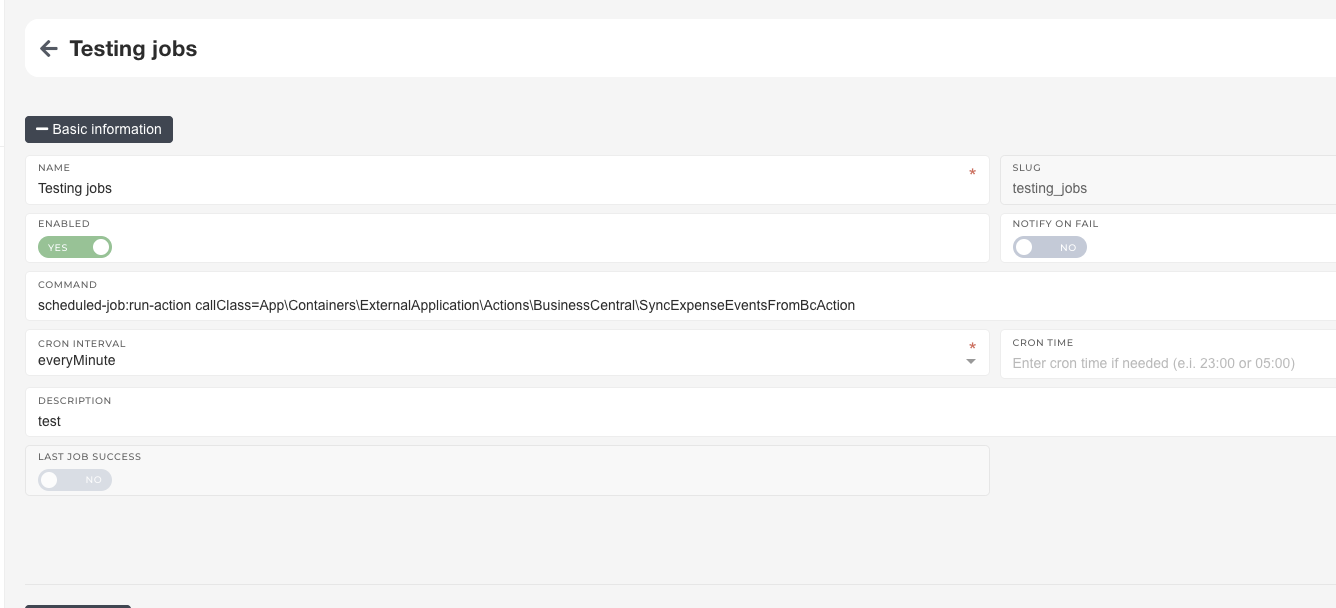
Sample command code:scheduled-job:run-action callClass=App\Containers\ExternalApplication\Actions\BusinessCentral\SyncExpenseEventsFromBcAction
It also takes an additional argument, that can be passed to it if want/needed: additionalArgument
Model sync settings
Overview
Event actions
Overview
Event actions are automated actions, performed by the system, when a set of conditions is met or a certain event is triggered (updating of a product, changing an order's status, creating a new invoice...).

Event actions are used for a variety of automated tasks, such as sending email notifications, updating statuses, performing hook calls...
Event actions are managed by ERP administrators.
Create new event action
This action requires the "create event action" permission.
To add a new event action, navigate to the "Add new action" form, by pressing the "+" button in the top right corner above the table.

Event actions should only be added by administrators with access to the code base, due to class names and their full paths being mandatory when creating new event actions. That information is only available to developers.

The creation form consists of several fields, required for creation of a new event action:
- Name:
- The name of an event actions should be simple and descriptive, making it easy to figure out an event action's function from name alone (eg. Send email to user when new order is created).
With the name set, the event that triggers the event action and the action that is performed by the event action need to be defined.

- Event full class name:
- A full path (namespace and class name) of the Event class that needs to be triggered to perform the event action (eg. App\Containers\Product\Events\ProductsStockUpdatedEvent).
- Action full class name:
- A full path (namespace and class name) of the Action class that will run once the Event is triggered. (eg. App\Containers\Mail\EventActions\SendEmailAction).
With the name, event and action defined, the three top switches can be toggled on/off.

- Enabled:
- Toggle an event action as active or inactive. Inactive event actions will never run.
- Fail in error:
- When this switch is toggled on, the action will be performed as normal, but will stop immediately on encountering an error.
- Notify on error:
- When this switch is toggled on, whenever the event action encounters an error, an email is sent to the development team to inform them of a failure when performing the event action.
Event actions can also be used to call external services via API calls when conditions are met.

- HTTP Method:
- The method of the API call. Valid call methods include POST, GET, PUT, PATCH, and DELETE.
- API URL:
- The URL of the external service API that will be called. Should be in format: https://[service]/[endpoint]
Arguments and conditions (currently) need to be written in JSON format.

- ARGUMENTS:
- Available arguments depend on selected "action class". This data can be provided by people with access to the codebase.
- eg. SendEmailAction class requires:
- "to": the email that will receive the notification email
- "html": the content of the email in HTML
- "subject": the subject of the email to be sent

- CONDITIONS:
- Available conditions depend on selected "event class". This data can be provided by people with access to the codebase.
- The example in the photo checks if a product's stock_total is lower than 0
- eg. The ProductsStockUpdatedEvent class has access to the product object, so we can build conditions with fields of a product, eg. product's "stock_total".
- We can set a condition by making a JSON object that includes product's:
- "field": Any field of a product model record (sku, name, short_name, id, ...)
- "value": The value that the field will be compared to
- "operator": The operation to run (the way to compare the value and the field)
- We can set a condition by making a JSON object that includes product's:
- Available conditions depend on selected "event class". This data can be provided by people with access to the codebase.
AVAILABLE CONDITION OPERATORS:
| "=" or "===" | Check if the field and value are the same. (strict comparison by value and by type) |
| "==" | Check if the field and value are the same. |
| "!==" | Check if the field and value are not the same. (strict comparison by value and by type) |
| "!=" | Check if the field and value are not the same. |
| "<" | Check if the field is less than the value. |
| ">" | Check if the field is mode than the value. |
| "<=" | Check if the field is less than or equal to the value. |
| ">=" | Check if the field is more than or equal to the value. |
| IN | Check if field is one of values in array. Value must be array here. |
| NOT IN | Check if field is not one of values in array. Value must be array here. |
| CONTAINS | Check if field contains the value. |
| DOES_NOT_CONTAIN | Check if field does no contains the value. |
| IS_TABLE | Check if the record's table is equal to value. |
| STARTS_WITH | Check if the field starts with value. Field and value must be strings in this case |
| ENDS_WITH | Check if the field end with value. Field and value must be strings in this case |
Update existing event action
Existing event actions should currently never be updated by anyone else but the developers. When a need arises for a different functionality, a new event action should be created, deactivating the old one.
Delete event action
Existing event action should never be deleted, instead being deactivated.
System options
Overview
System options are settings that are used by the administrators to customize the ERP system.
These options should only be managed by people, who understand their purpose and context, as changing a key option could lead to severe issues within the ERP, if done wrong.
These settings can range from the primary color of the web site to a predefined greeting on auto-generated documents.

Create new system option
This action requires the "create system option" permission.
A new option can be created by accessing the creation form on the system options page through the "Create new" button.

You get redirected to the creation form page, where you can input required information to add a new system option.
All required form fields are marked with a red asterisk.

Be careful, as you should define only either value or data. If both are defined, only value will be used.
Update existing system option
This action requires the "update system option" permission.
To update an existing system option, find it in the table, and click the "edit" button at the end of it's row.

This takes you to the editing form, where you can update the option's name, slug, description and value/data.
TIP: Data is required to be in the JSON format. When editing it here, a preview is shown on the right, and you are notified if errors are present in the JSON structure itself.

Delete system option
This action requires the "delete system option" permission.
To delete a system option, use the checkbox to select it, and then click on the "trash" icon, that appears in the top right corner of the page. You will be asked to confirm you want to delete the system option.

NOTICE: Deletion of system options should only be done, when the option is no longer used, and should be done only after consulting with someone, who understands ERP's utilization of options.
Rebook matrix
An interface for managing ERP product rebookability.
Rebook Matrix
This page acts as an interface for managing what product types can be rebooked into what other product types.

After a product type is selected, a switch is displayed for each available product type. These switches can be used to toggle, if products of the selected product type can be rebooked into any of displayed product types.

Promo and Work Equipment
Process of MO orders, requesting promo or requesting work equipment
Requirements
Merch order
- If promotional product is not in stock, it needs an active Rebook BOM with reselling material and technology rebook.
- The rebook BOm should contain the promotional product's reselling counterpart.
Receive new MO order
Request promo
To access this page, the "request promo" permission is required.
On this page, users can create promotional material orders for themselves or other users.

This page only lists products of types Prints and Promotional products with attached shop tags.
To add items to the order, click the "Add" button next to the product, the items and their set quantity will be added and displayed in the cart. The item quantity can then be changed from the cart, if needed.
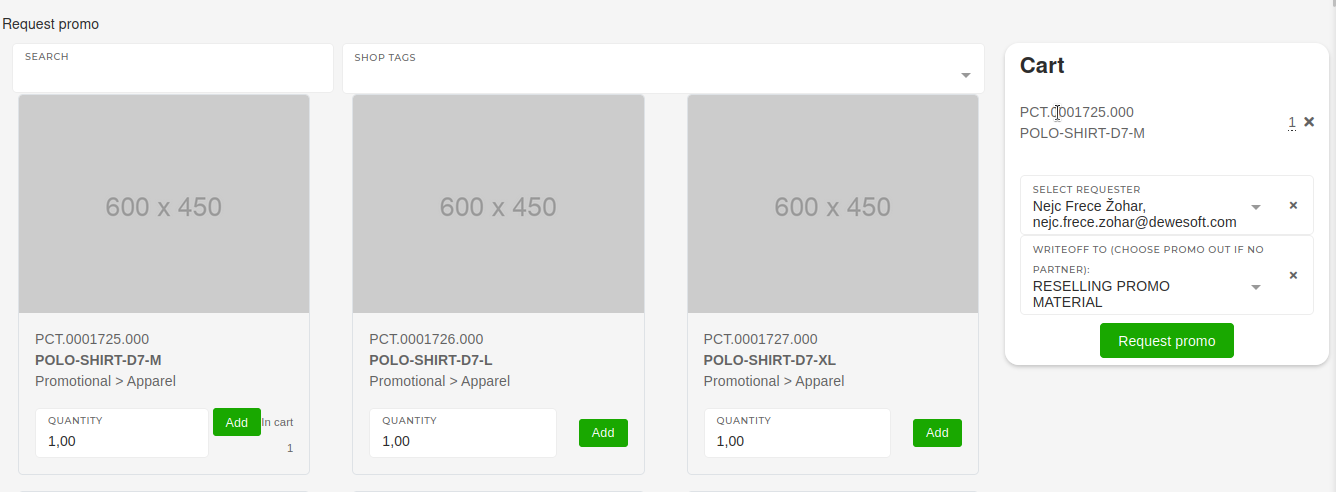
Once all items are in the cart, select the requester user and the right promo warehouse. Once all that is selected, clicking the "Request promo" button will create a promo order, which will then get processed in the warehouse.
Request missing work equipment
This action can only be performed by department heads.
To request work equipment, open the "workflow approval" page and and select the "Missing work equipment" button in the "Actions" section.
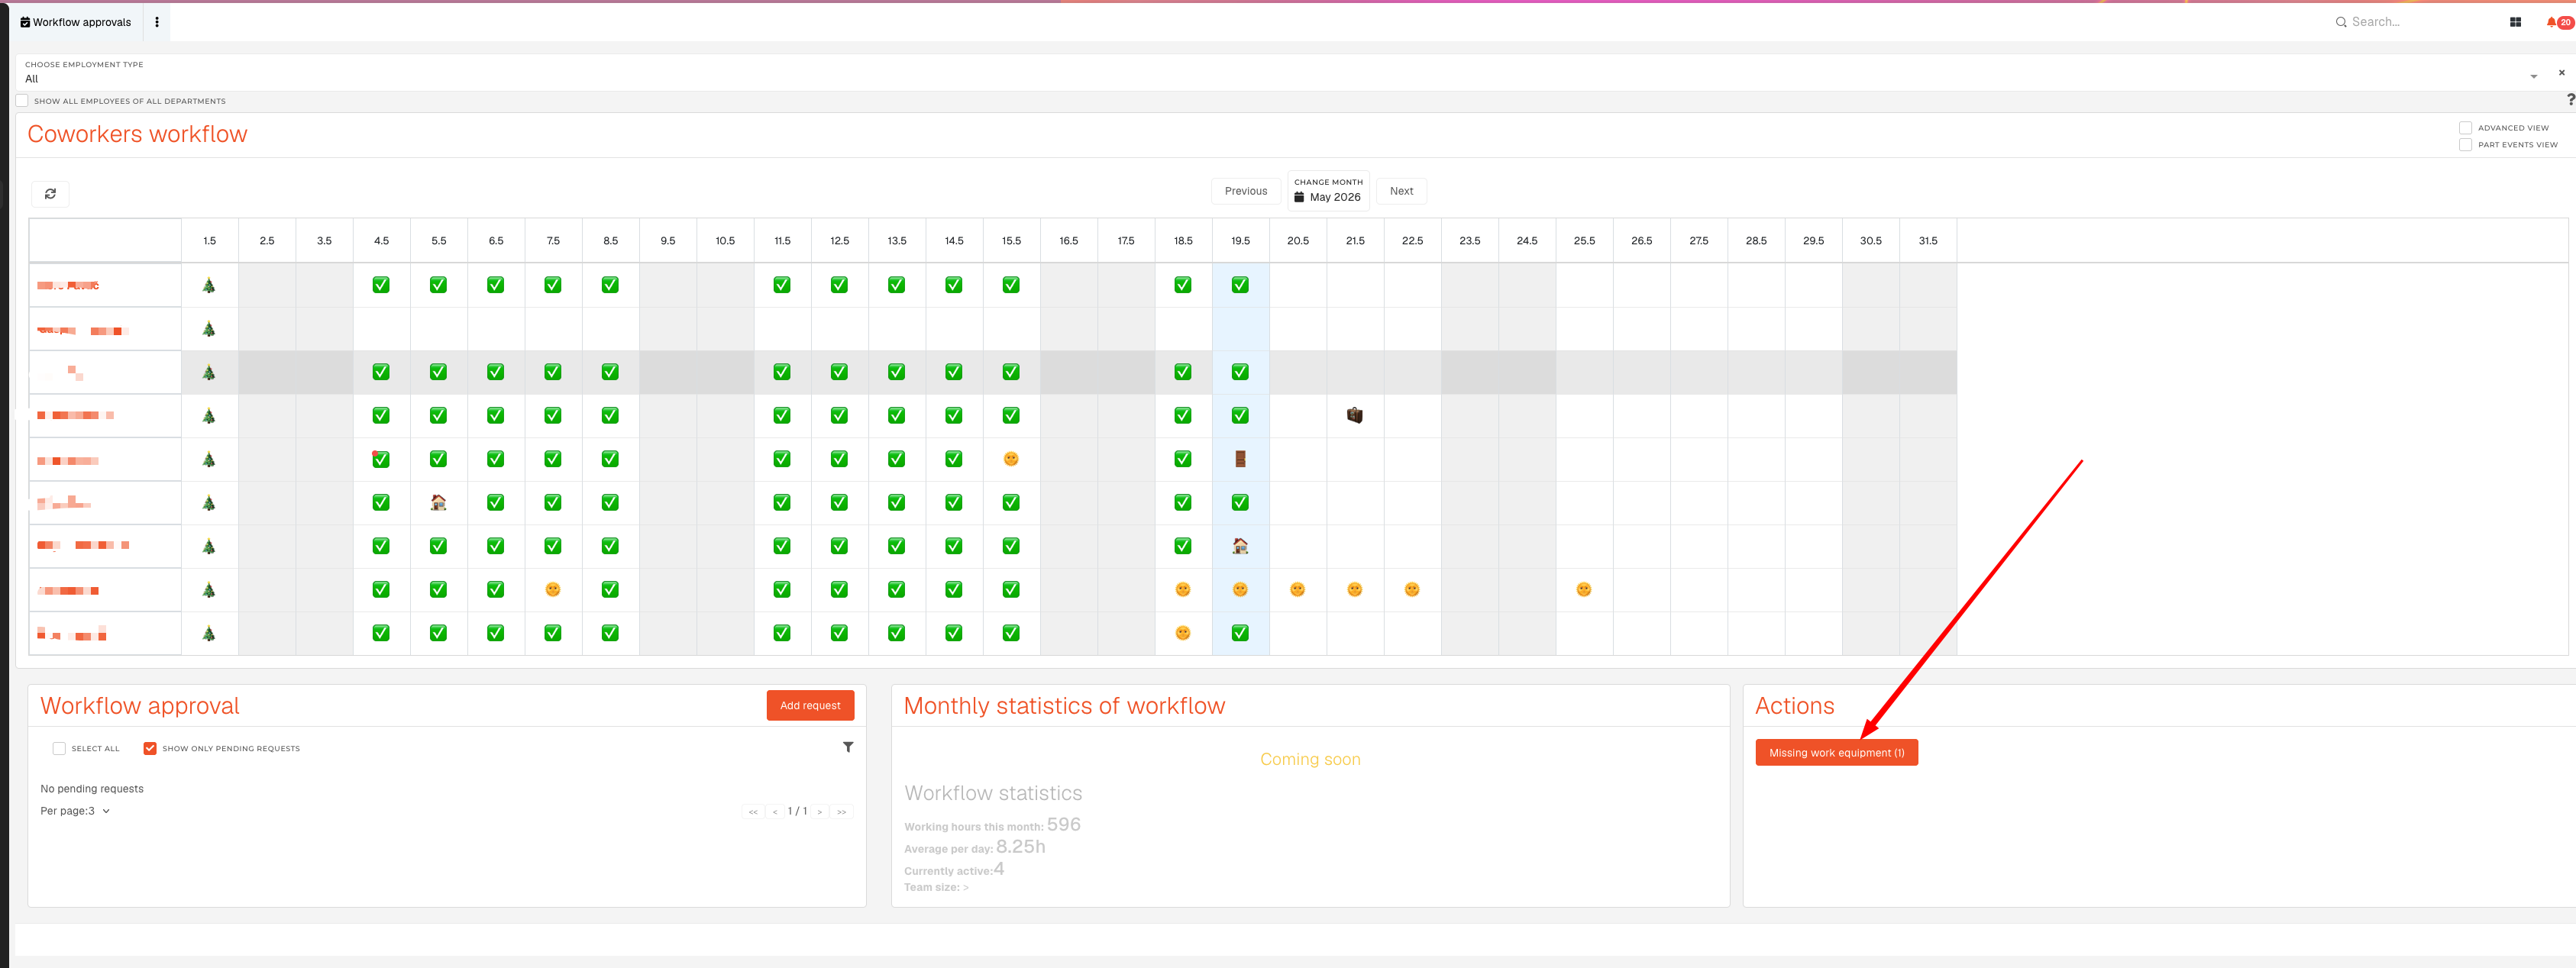
You will see a list of required work equipment, where you can select work equipment for each employee:
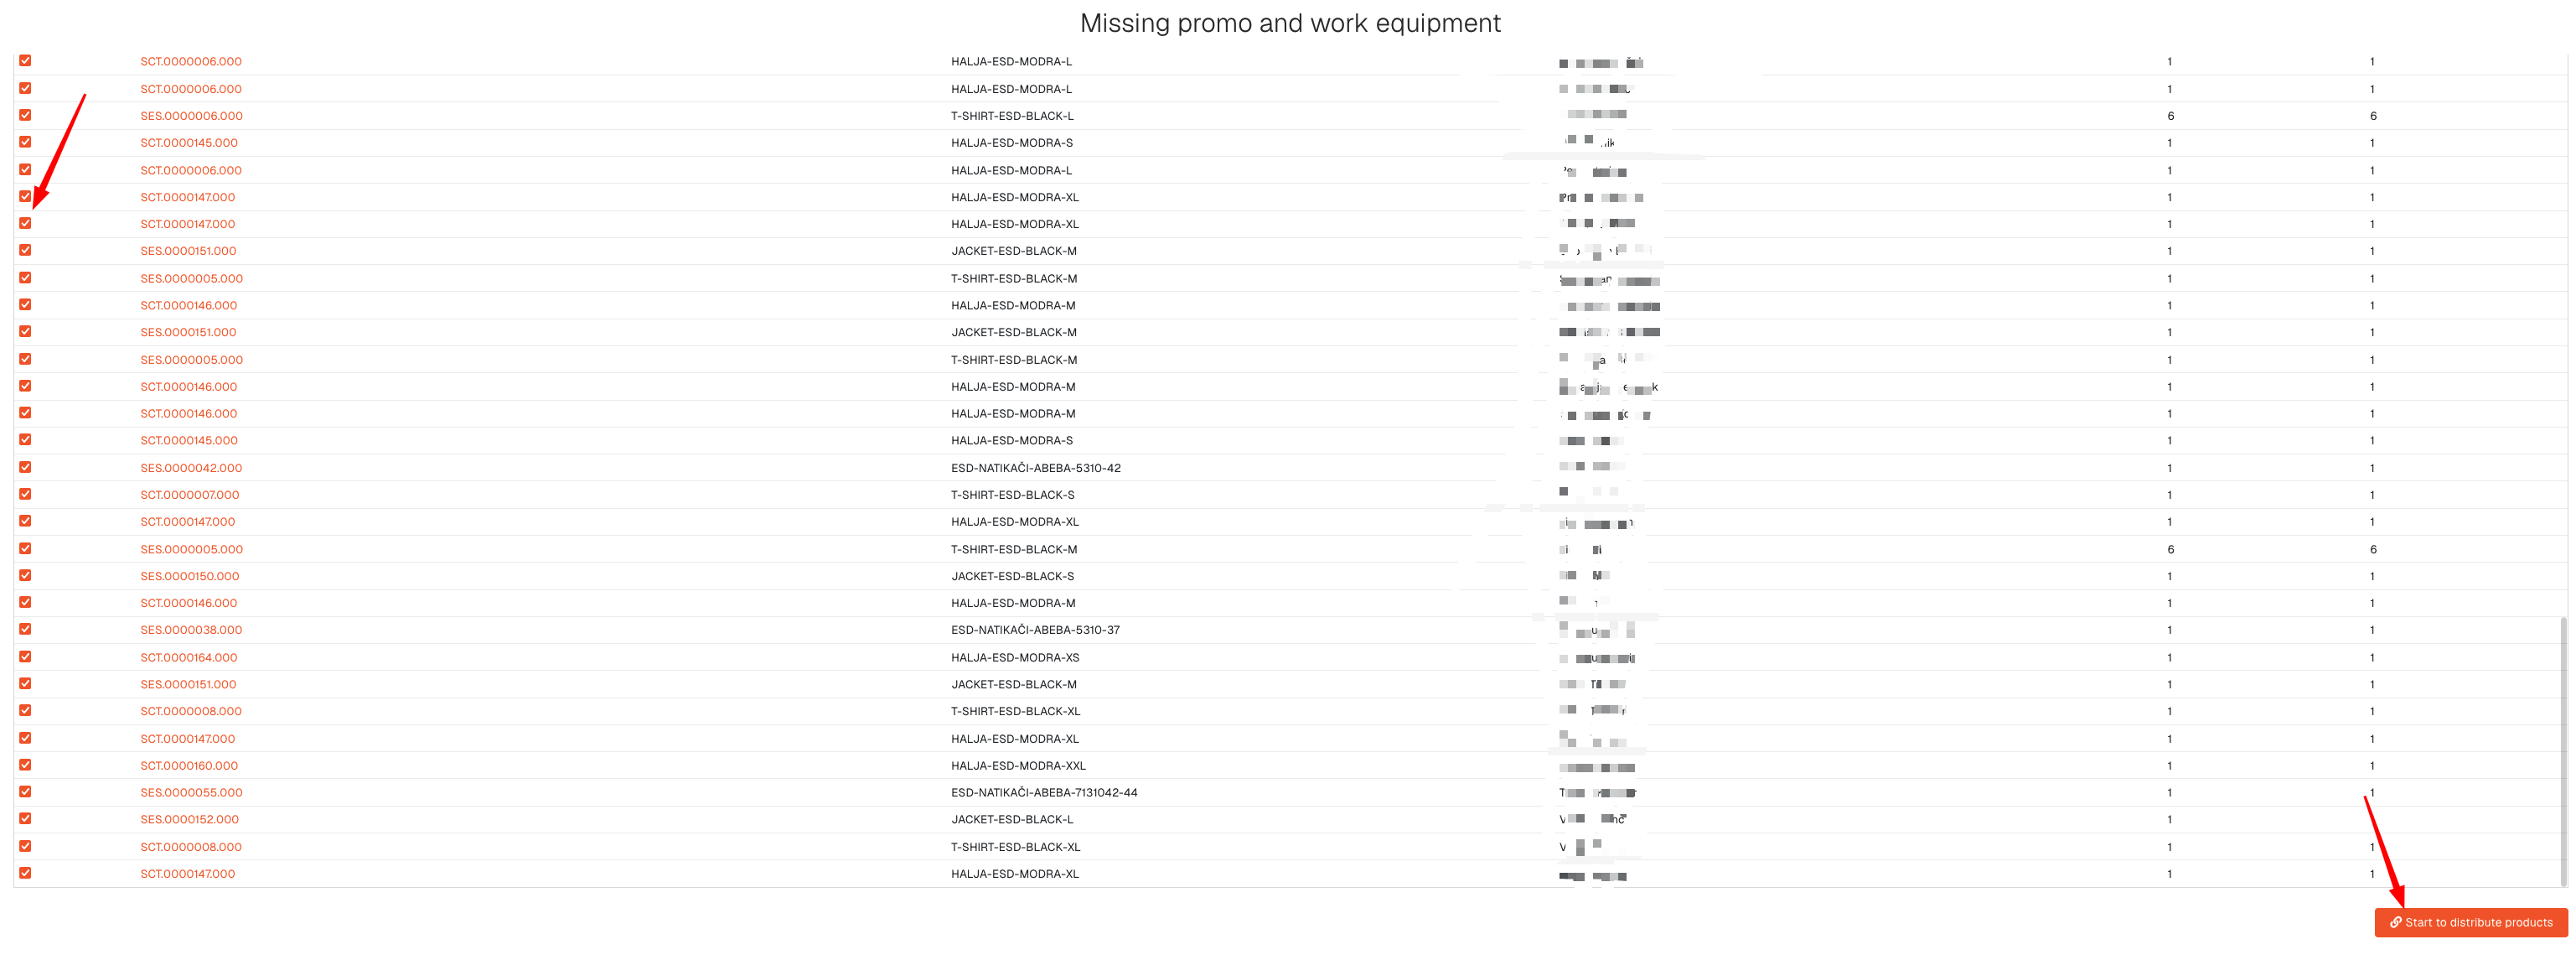
After clicking the "Start to distribute" button, the work equipment distribution process will be started.
Check page: https://how-to-erp.dewesoft.com/books/admin/chapter/promo-and-work-equipment
Reservation and rebook
The process of requesting promo or work equipment, the system performs several steps in the following order.
- 1. Work orders are created for rebooking
- These work orders are used to get required material for purchasing
- 2. System hourly check for available stock
- The system performs automatic stock checks. Once stock is available, the next step is triggered.
- 3. When stock is available, a task for Rebook is created
- These tasks get created automatically, and are assigned to warehouse manipulators.
- 4. Warehouse manipulators perform the Rebooking task
- Within the task, warehouse manipulators take items from available locations.
- On task completion, material is rebooked.

- If necessary, the system automatically rebooks reselling products to promo or protective gear products
- This is usually done, when no promo product stock is available, but reselling product stock exists.
After the task if finished, the process continues.
Check here: https://how-to-erp.dewesoft.com/books/admin/chapter/promo-and-work-equipment
Pickup products
After reservation and rebook tasks are completed, the assigned user receives a task to pickup products. This can be done at the warehouse window.
Promo order pickup
If the order is for promotional products, the task is assigned to the requester.

Once products have been collected by the assigned user, the order's "end customer" can be notified to collect items by clicking the "Notify user" button.
If the "pick-up" task is from a merch order, closing it will will trigger a material write-off, create invoice and delivery note. The created invoice will then be automatically sent to the "end customer".
After promotional items are "picked-up", the requester should click the "Write-off products and complete task" button. This will finish and close the task.
Work equipment pickup
If the order is for work equipment, the task is assigned to the head of the department.
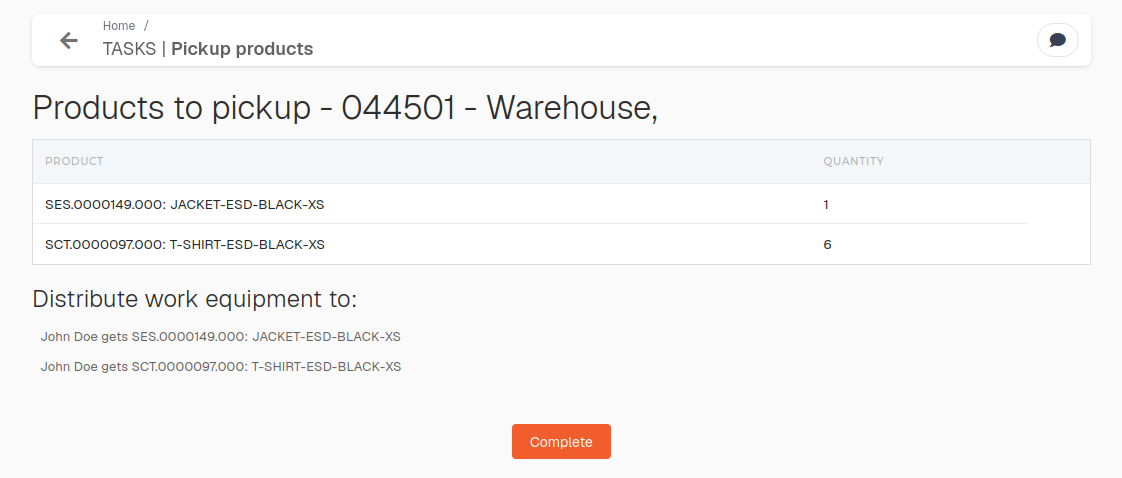
After items are "picked-up" , the head of the department should click "Complete" to finish and close the task.
Print signers
Overview
Print signers are users, who are responsible for signing certain documents.
The "print signers" table is used to define, which user is signing which document print and for how long (from and until dates).

Create new print signer
This action requires the "create print signer" permission.
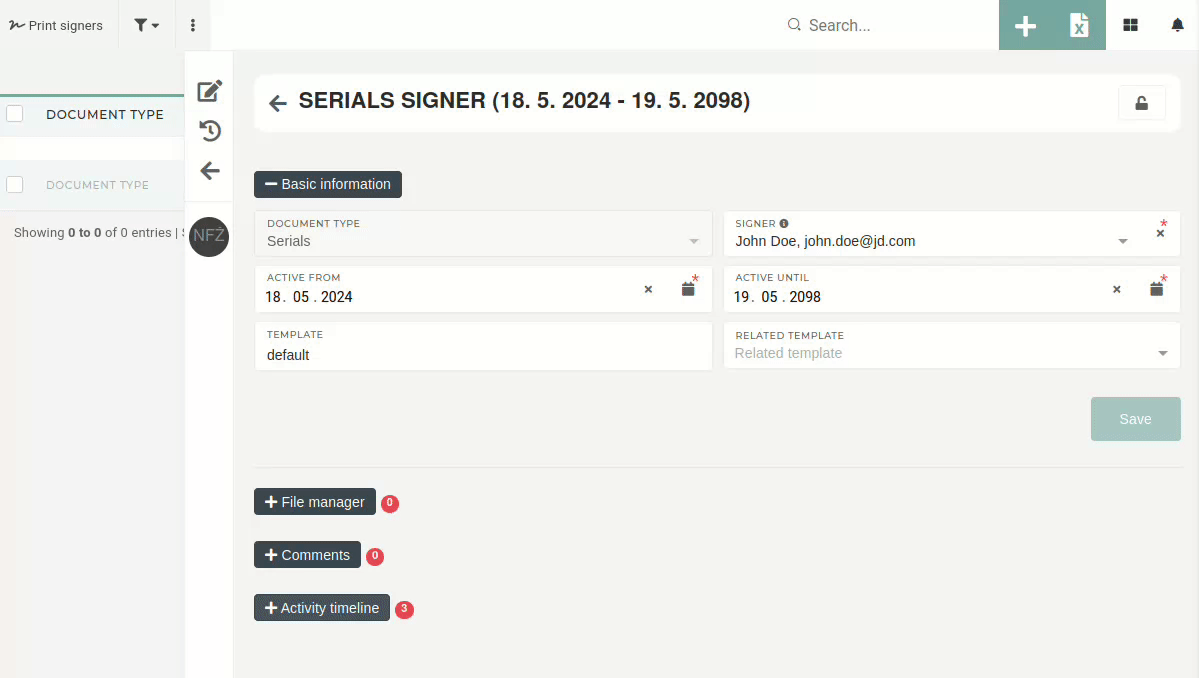
New print signers can be created through the Create new print signer form.
There can be only one print signer of a document type's template active at any given time.

The selected "Signer" can be any existing user, but the user must have a signature set on their profile, otherwise the only thing, shown on the print will be their full name and department.

When creating a new print signer, mind the "Active from" and "Active to" date fields. If these dates would conflict with an existing print signer, an error message will appear when saving the form. This message will explain, which print signer (past or current) is in conflict with the print signer, that is being created.

Another requirement regarding the "Active from" and "Active to" date fields is that the "Active to" field must always be after the "Active from" date.

Update existing print signer
This action requires the "update print signer" permission.
Past signers cannot be edited. Signers have the "Active/Inactive" state, determined by the "Active from" and "Active to" dates. If a signer is inactive, the entire edit form is disabled, to prevent changes that could cause problems.
Only currently active print signers can be updated, as changing past print signers could cause conflicts.

Once a print signer has been created, its "Document type" is locked and cannot be changed. This is to ensure no conflicts occur when updating active signers.

When updating the "Signer" , keep in mind that changing the selected user will impact all document prints in the selected active range (active from - active until).
While active range dates can be edited, the "Active from" date should not be changed, as that could cause conflicts with past print signers.
If the dates are changed and would cause conflicts when saved, a message is displayed, informing the user, which print signer's dates overlap with the new ones.

If a print signer is, for whatever reason, no longer signing a document print, the "Active to" date should be set to the previous day and the form will disable itself automatically.
After that, a new print signer has to be created to replace the now inactive print signer.
Delete print signer
This action requires the "delete print signer" permission.
Print signers, who are no longer active, should never be deleted, as they are still used when generating signed documents, created in the past (during the time when they were active signers).
Inactive print signers should never be deleted.
Only signers, whose "active from" date is set in the future, should be deleted, if necessary, since they have not been active yet.
Custom models
Overview
Create new custom model
Update existing custom model
Delete existing custom model
Custom fields
Overview
Create new custom field
Update existing custom field
Delete custom field
Workflows
Overview
Workflows are used to define status flows for different record types.
These flows are used to set, which status follows the next one and in what order they should be changed.

Create new workflow
This action requires the "create new workflow" permission.
New workflows can be created through the Create new workflow form.
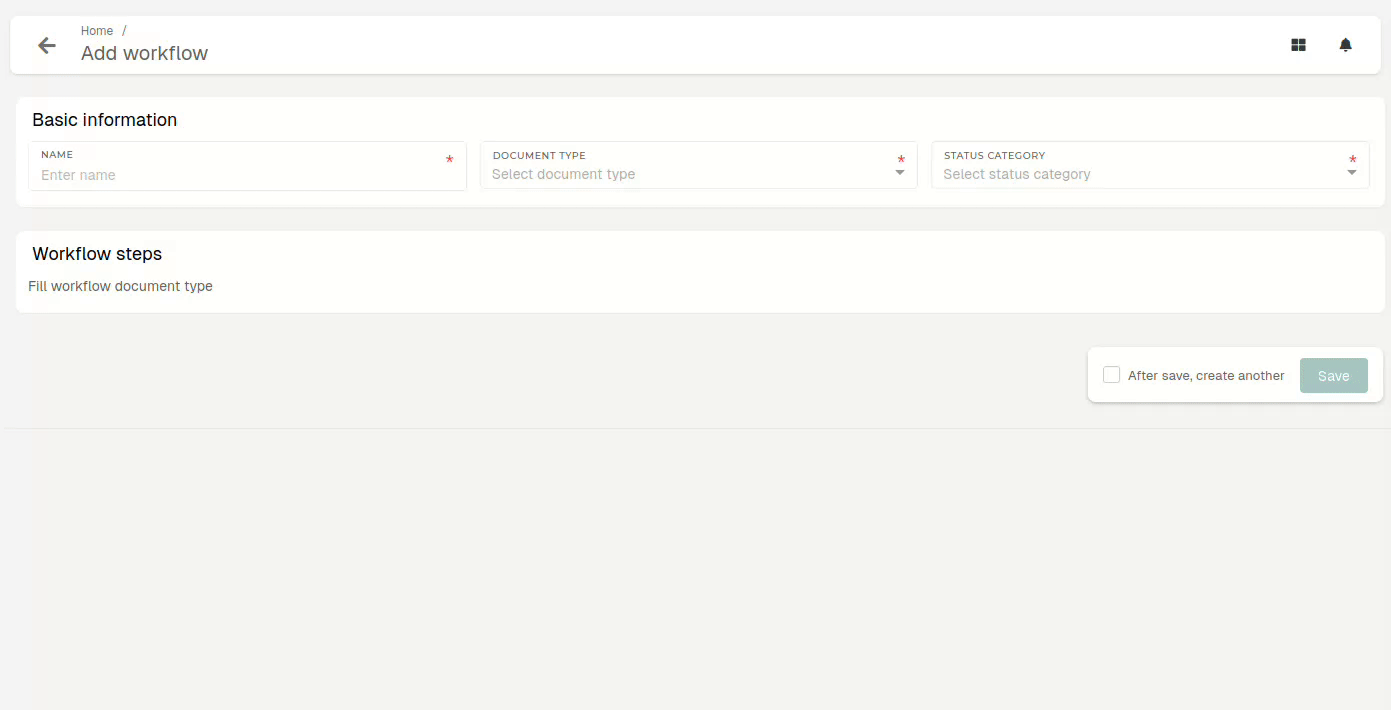
There should be only one workflow for every status category of a certain document type.
Workflow steps
workflow steps define how a record can move between statuses (from which status into which status). Available statuses for the workflow steps depend on the selected "status category".
Once a workflow is created, only statuses, defined in workflow steps will become valid. Any other status within the selected status category of the document type will result in an error.
Update existing workflow
This action requires the "update workflows" permission.
Delete workflow
This action requires the "delete workflow" permission.
Workflows can be deleted.