Code lists
- Partners
- Production facilities
- Work resources
- Work resource types
- Templates
- Template types
- Technology
- Technology steps
- Work skills
- Product types
- Product stock types
- Product classifications
- Export control classification numbers
- Tax types
- Expense events
- Tariff codes
- Cost centers
- Batch serials
- BOM types
- Sales types
- Payment terms
- Payment methods
- Incoterms
- Invoice clauses
- Regions
- Countries
- Currencies
- Holidays
- Tags
- Document form templates
- Departments
- Floor map
- Work equipment
- Safety standards
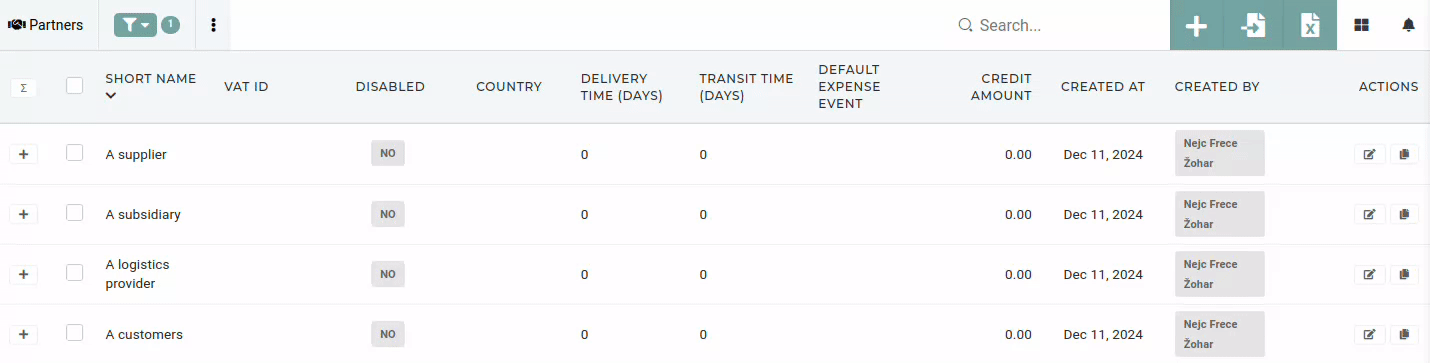
Partners
Overview
In the ERP system, partners are used to refer to external entities, usually other companies. with which the organization interacts.
Partners are used to represent customers, suppliers, logistics providers, or company subsidiaries.

Partners are managed in the partners section. Each partner entry includes essential details such as full, short and native names, contact information, tax data, payment terms, and roles, enabling seamless integration and streamlined operations across the organization.
Create new partner
-
Update existing partner
Partners should only be updated by authorized users.
-
Delete partner
This action requires the "delete partner" permission.
Partners should never be deleted, unless they are a duplicate partner with no history (no linked order, invoices...). Before any partner is deleted, the accounting department should be contacted for conformation.
To delete a partner, find it in the table and tick its checkbox. Then click and confirm the "delete button".
Production facilities
Work resources
Work resource types
Templates
Template types
Technology
Technology steps
Work skills
Product types
Product stock types
Product classifications
Export control classification numbers
Tax types
Expense events
Tariff codes
Cost centers
Batch serials
BOM types
Sales types
Payment terms
Overview
Create new payment term
Update existing payment term
Delete payment term
Payment methods
Incoterms
Invoice clauses
Regions
Overview
Regions are used to streamline operations and manage processes across multiple countries with shared characteristics.
They simplify tax configurations and compliance for areas with common rules, such as the European Union, and support aggregated reporting for regional performance analysis. Regions optimize supply chain and logistics by improving inventory distribution and shipping across neighboring countries, while also enabling businesses to define regional pricing, promotions, and marketing strategies tailored to similar market conditions. They help standardize master data, such as suppliers or customer groups, and manage localization settings like language preferences and currency groupings. Additionally, regions are used to control user permissions and workflows specific to certain areas, ensuring compliance and operational efficiency across countries with shared traits.
Countries
Overview
Countries are essential for configuring location-specific settings and ensuring compliance, localization, and efficiency in global operations. The ERP contains a list of over 250 countries.
Countries cannot be added or deleted by users.
They are used to define tax rules, such as VAT and to ensure transactions align with local legal requirements. Countries standardize address data for users, customers, vendors, and internal locations, facilitating smooth shipping and billing processes.

Countries are linked with currencies for multi-currency financial operations. Additionally, they are used in global reporting, helping organizations analyze and manage performance across regions effectively.
Update existing country
This action requires the "Update countries" permission.
Countries are automatically added, when a new ERP instance is created. All of this information, however, can be updated later if necessary.

Information of countries in ERP include:
- Short country name (eg. Slovenia)
- Full country name (eg. Republic of Slovenia)
- Country ISO
- Currency information
- Country's latitude and longitude.
Currencies
Holidays
Overview
Holidays in an ERP’s HR module serve as a centralized reference for public, regional, and company-specific holidays, ensuring consistency and compliance in workforce management.

Holidays are marked on the HR dashboards with the "🎄" icon.
Holidays are used to calculate holiday pay and overtime accurately, aligns attendance and leave records by excluding holidays from leave balances, and supports staff planning during holidays. It also ensures compliance with regional labor laws and enhances transparency by allowing employees to view upcoming holidays through the calendar on their profile page.

Every holiday, eg. "New Year’s Day" consists of a date and full holiday name, streamlining holiday-related processes across HR functions.
Create new holiday
This action requires the "create holiday" permission.
New holiday entries can be added through the "Create new holiday" form, which can be found above the "holidays" table or directly "here".

When adding a new holiday, the only information needed are the holiday's name and the date it falls on in a given year.
Update existing holiday
This action requires the "update holiday" permission.
Holidays should not be updated due to their use within the HR module. Dates of existing holiday entries should not be updated, as changing the dates could impact planned employee vacations or workdays. However, holidays can be updated, if necessary.

Delete holiday
This action requires the "delete holiday" permission
While holidays can be deleted if necessary, it is strongly recommended to avoid deletion to maintain data integrity and prevent disruptions in processes such as payroll, attendance, and compliance tracking, as well as keep accurate history of past holidays, that impacts used employee leave.

To delete a holiday, tick its checkbox in the table, then click and confirm the "delete button".
Generate holidays for year
This action requires the "create holiday" permission.
Holidays can be added one at a time through the "Create new" form or they can be generated for the entire year through the "Add holidays for year" form.

To generate holidays for a select year, first we have to select the year, from which we will copy the holidays, eg. 2024. We then select the year that we want to generate the holidays for, eg. 2025. Once both years are selected, a list of all holidays will appear with dates for the new year generated. You can now uncheck holidays that you don't want to generate.

Once you have made sure, that all the (checked) dates are correct, press the "Generate" button. This will create a list of new holidays for the selected year.
New holidays must be added for every year, as they are required for handling vacations within the HR module.
Tags
Overview
Tags are used to categorize announcements, mark EOL products, setup product hierarchies, shown in price lists...

Create a new tag
Create form

On this form, the only necessary information are name (the actual display name of the tag), slug (a unique value that represents the new tag), table name (the table this tag belongs to (products,orders...)) and type (group of tags, like default, other...).
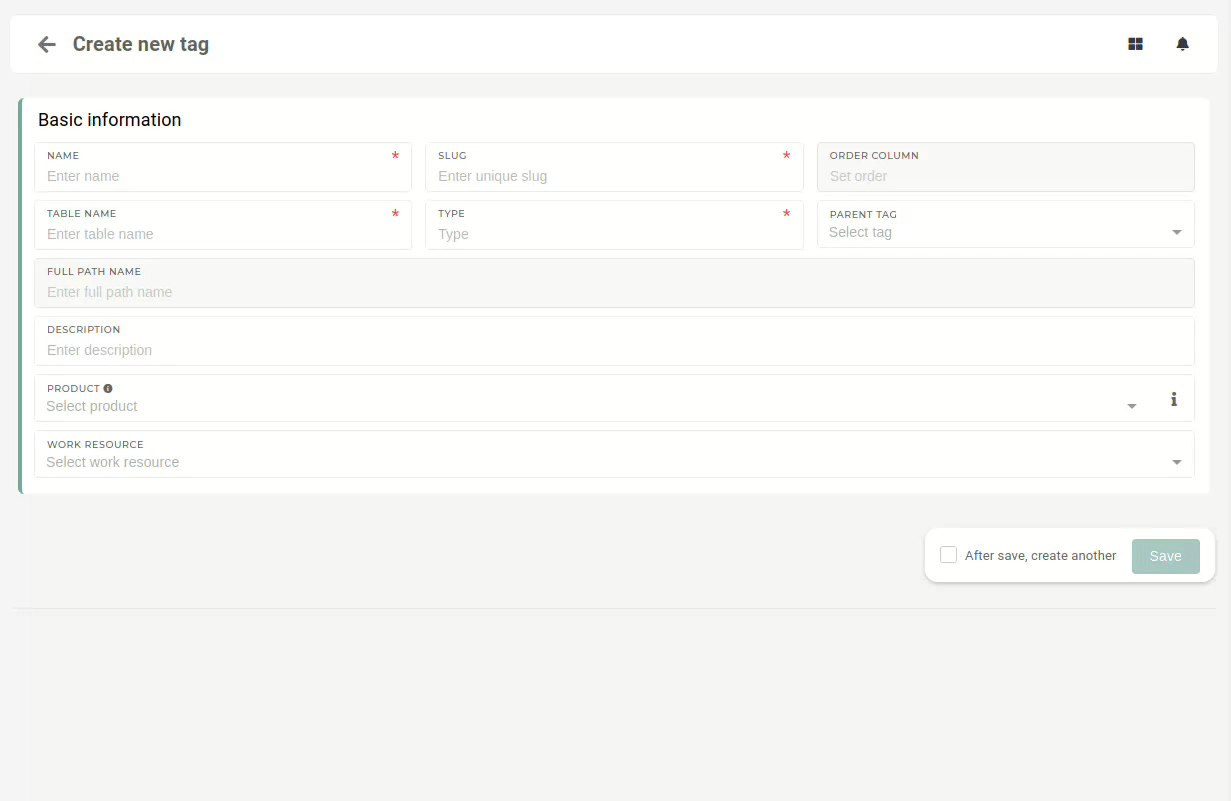
When a new category for tags is required, a new tag with that category can be crated with the "create" form.
Tag editor
In the tag editor, all tags are grouped into categories. To add a new tag into a category, open the category section and press the "Add tag" button at the bottom of the list.


Update an existing tag
Editing in tag editor
In the tag editor, you can create new tags, edit their names, clone or delete them. You can also add sub-tags to existing tags.

Any further editing has to be done from the tag details page.
Editing on details page
On the details page, all of a tag's data can be edited, from its name and description, to its type. A tag can also be nested from this page under any selected parent tag.

The details page also provides an editable list of all products and work resources, that have been tagged with this particular tag.
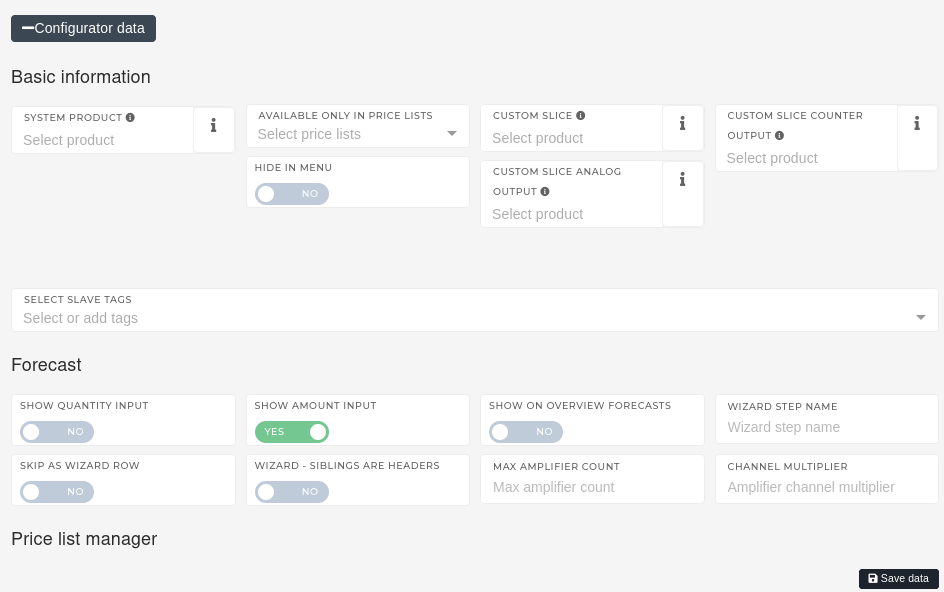
Tag configurator data
If a tag is associated with a product, that is part of a price list, then its Configurator data can also be edited in the details page, in the "configurator data" section.
Delete tag(s)
In the tag editor, the "x" symbol next to the tag name can be used to delete it.
Tags with existing sub-tags cannot be deleted in the tag editor.

To delete a tag via the table view, search for it, tick its checkbox, then click and confirm the trash button.

Using tags

The selection only includes tags, that are of a certain type (products can be tagged only with "product" tags...).

Document form templates
Departments
Floor map
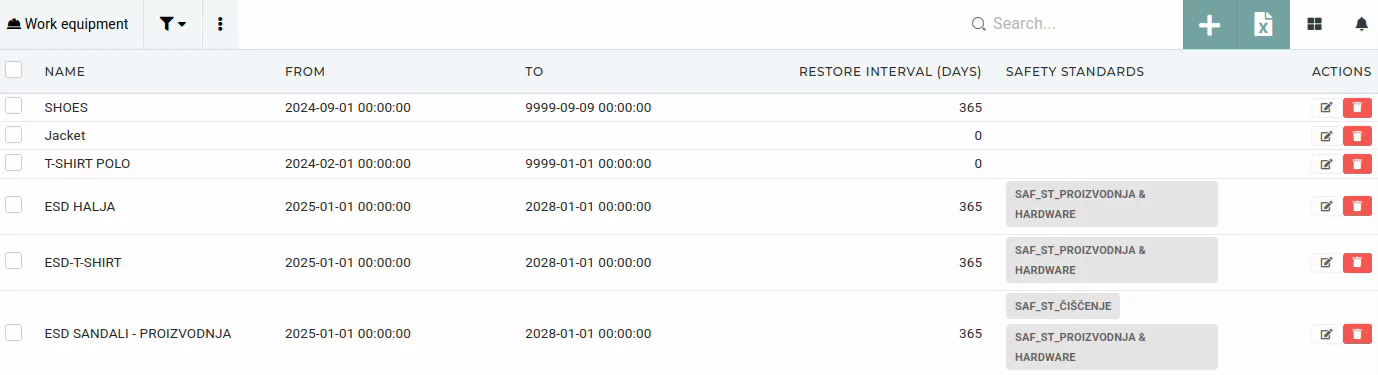
Work equipment
Overview
Work equipment represents products/materials that are required by a certain work position.

One work equipment can hold multiple versions of the same product (eg. shirts with different confection numbers: M, S, L, XL...).
Create work equipment
This action requires the "create work equipment" permission.
New work equipment can be created through the "Create new work equipment" form.

When creating a work equipment, at least its name is required.
- Name:
- The name should be descriptive, to avoid confusion with other work equipment.
- Products:
- On or more products, that are used as this work equipment (safety goggles or shoes with different sizes...)
- Only products that have define confection size, will appear here.
- From:
- The date, when this work equipment becomes active (starts being used)
- To:
- The date, when this work equipment becomes obsolete (stops being used)
- The date, when this work equipment becomes obsolete (stops being used)
- Restore interval (days):
- Define the renewal period for employee equipment (they will get new equipment every X days).
- Safety standards:
- Select which safety standards include this work equipment.
- One work equipment can be used by multiple safety standards
- Select which safety standards include this work equipment.
Update work equipment
This action requires the "update work equipment" permission.

Through the update form, you can update:
- Name of the work equipment
- Products, that are used as this work equipment
- How long the work equipment is valid (From and To)
- Restore interval (employees receive new work equipment every X days)
- Safety standards, that this work equipment is used by
Safety standards for work equipment can also be set from the safety standard update form.
Delete work equipment
This action requires the "delete work equipment" permission.
Work equipment can be deleted by toggling their checkbox when viewing in table or by clicking the "trashcan" button on the right.
You can only delete work equipment that is not attached to any safety standards or work positions.
If the work equipment is attached to any safety standards or is set on any work positions, deleting will not be allowed.

Safety standards
Overview
Safety standards are used to set which work equipment is required/available for a certain work position.

Example: Work position construction worker would need work equipment Hardhat, safety vest...
Create new safety standard
This action requires the "create safety standard" permission.
A new safety standard can be created through the "Create safety standard" form.

When creating a new safety standard, at least the safety standard's name is needed. All other information can be entered later.
Safety standards do not have a naming convention, the SAF_ST_ prefix is merely a suggestion.
When creating a new safety standard, you can define, for which work positions it applies.
Example: The Kitchen safety standard would apply work positions chef, cook, dish washer...
Update safety standard
This action requires the "update safety standard" permission.

Through the update form, you can manage:
- Name and description of the Safety standard
- Work equipment, that is part of the safety standard
- Work positions, to which it applies
Both work positions and work equipment can also be connected to the safety standard from their own update forms.
Delete safety standard
This action requires the "delete safety standard" permission.
Safety standards can be deleted by toggling their checkbox when viewing in table.
You can only delete safety standards that do not have any work equipment or work positions assigned.

If the safety standard has either any work positions or any work equipment attached, deleting will not be allowed.
