Products
- Products
- Overview
- Create new product
- Update existing products
- Delete products
- How SKUs are generated
- Bulk replace material
- Product safety stock
- Product suppliers
- Bill of materials (BOM)
- BOM presence
- Product lines
- Projects
- Serial numbers
- Overview
- Create new serials
- Update existing serials
- Delete serials
- Extend serial's warranty
- Troubleshooting: duplicated serials
- Troubleshooting: Find serial stock source
- Fixed assets
- Licenses
- Overview
- Create new license
- Update existing license
- Delete license
- Restore license
- Downgrade license
- AGV robots
Products
Overview
Products are used in the ERP to represent objects, that are used in the work processes, ranging from materials, tools, office supplies, work equipment to finished and semi-finished products. They are used throughout most work processes, including purchasing and selling processes.
Every product is, when created, assigned a unique SKU (Stock Keeping Unit) number, that will be used to refer to this product within the system. All SKUs are required to be unique, duplicates are not supported.

Create new product
This action requires the "create products" permission.
New products can be created from the "Create new product" form, that can be accessed here, or by clicking the "Add new" button above the products table.

From the form, a new product can be created.
To create a new product, at least a product's name, short name and SKU are required.

To generate a correct SKU, product type and product classification should be entered (type and classification are used to determine SKU structure).
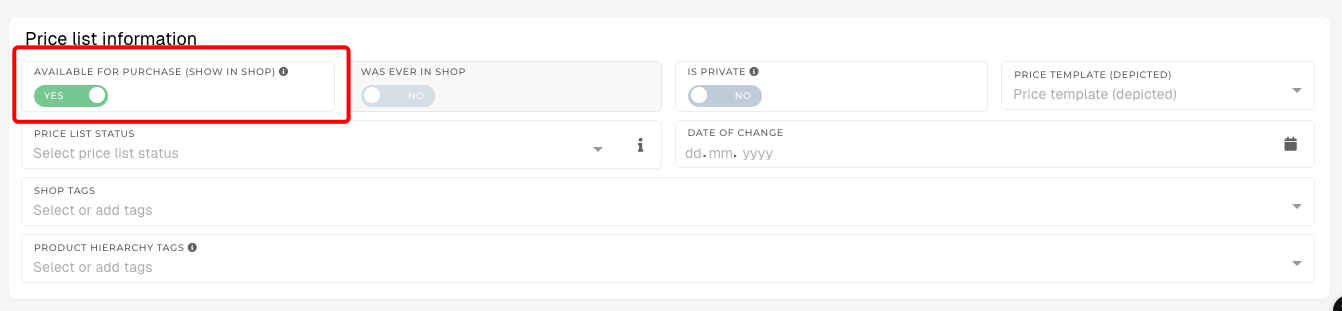
Making a product visible for adding in quotes/orders (local items)
To make a product available for selection in quotes or orders, you first need to enable its availability for purchase using the toggle in the Price List Information section.
 Next, in the Price List section, add the product to the specific price list you want.
Adding a Product to a Price List
- Locate the desired price list – In the Price List section, find the price list you want to add the product to (e.g., END_MENA 2025).
- Add the product – Click the + Add button next to the price list name.
- Set the price – Enter the desired price in the field (e.g., 471.00 €) or adjust an existing price.
- Save changes – Ensure your changes are saved so the product becomes available in that price list.
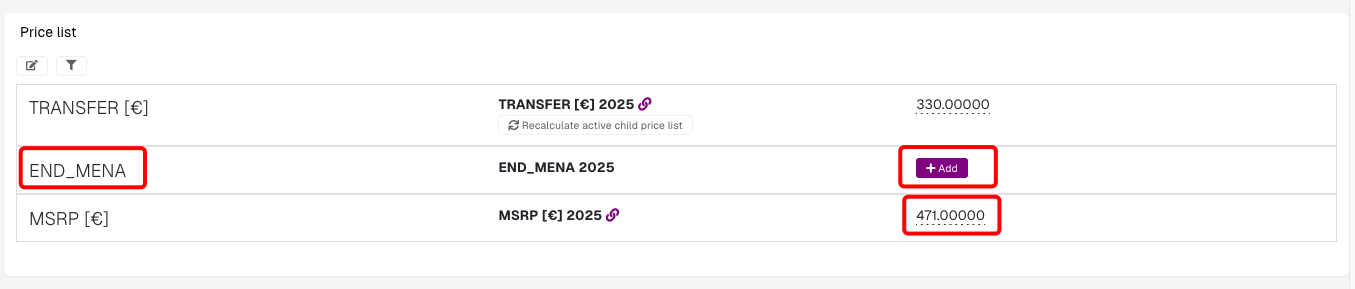
Once completed, the product will be visible in quotes and orders (if it is also marked as available for purchase in Price List Information).
Update existing products
This action requires the "Update products" permission.
When it comes to updating product's properties, there are specifics regarding certain properties.

Product SKU
Every product has its own unique SKU, which must remain unchanged, to avoid unintentional duplicates.
Product's SKU should not be changed, if at all avoidable.
Product short name
A product has a full and an abbreviated version of its name. The short version of the name should not be updated, as it version it is written on many documents, including invoices. Short name should remain unchanged to avoid any discrepancies.
Product's short name should not be updated, if issued invoices exist for that product.
Product type and classification
Product type or classification should not be changed unless the SKU must be changed, as these properties are linked. Type and classification are used to determine SKU structure.
Changing only either type or classification will result in an error.

Delete products
This action requires the "delete products" permission.
Deleting products is not advisable, as they are referenced in many places in the ERP system, but can be done from the products table.
Only products, created recently (eg. a month ago or within the current year) should be considered for deletion. Old products that are no longer being sold, should be marked as deprecated or obsolete instead.
To delete a product, locate it in the table. Then tick it's checkbox and press the "Trash" button. A confirmation dialog will appear, and once confirmed, the product will be deleted.
Attempting to deleting any product with existing transactions will result in an error.

You can select and delete multiple products at once.
How SKUs are generated
Every product can have only one SKU and every SKU has to be unique. Duplicate SKU-s are not supported.

Example: MME.0038447.11B
In this example, the prefix MME stands for Materials, Metal (M - Materials, ME - Metal), the number 0038447 means, that this is the 38447th MME product. The suffix 11B means that the product revision is 11B.
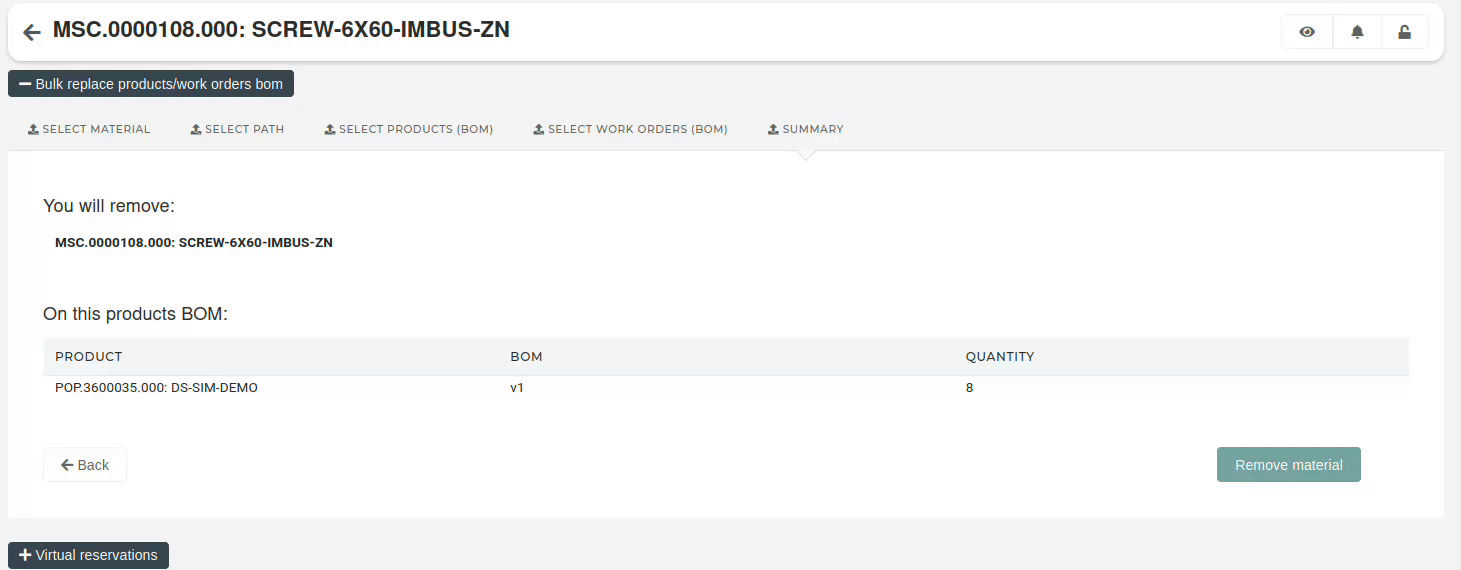
Bulk replace material
Products can be replaced in bulk across product BOMs or in work order item BOMs.
To bulk-replace a product, open its details page and find the "Bulk replace products / work orders bom" section.
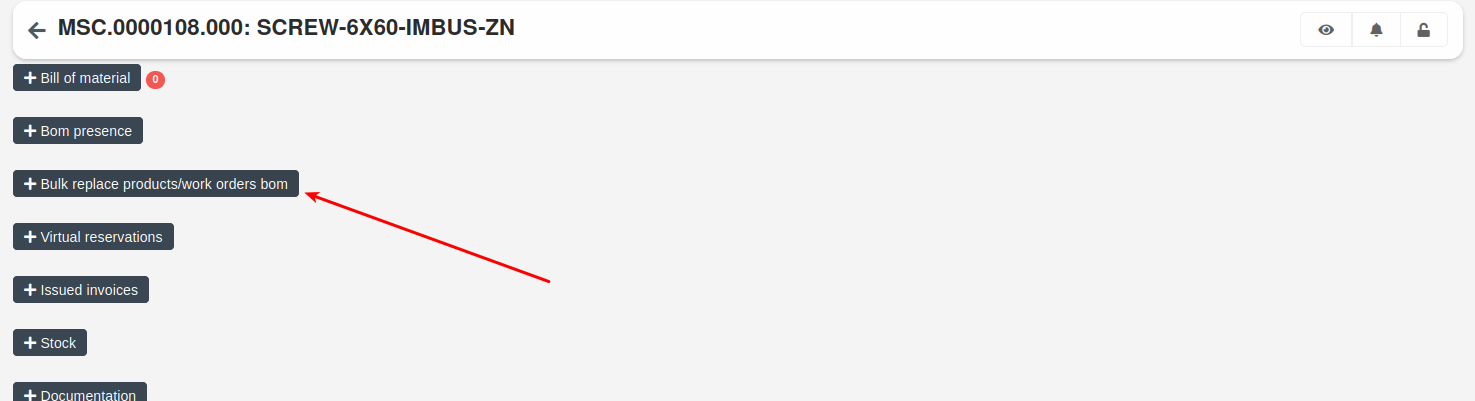
Open it and follow the steps in it.
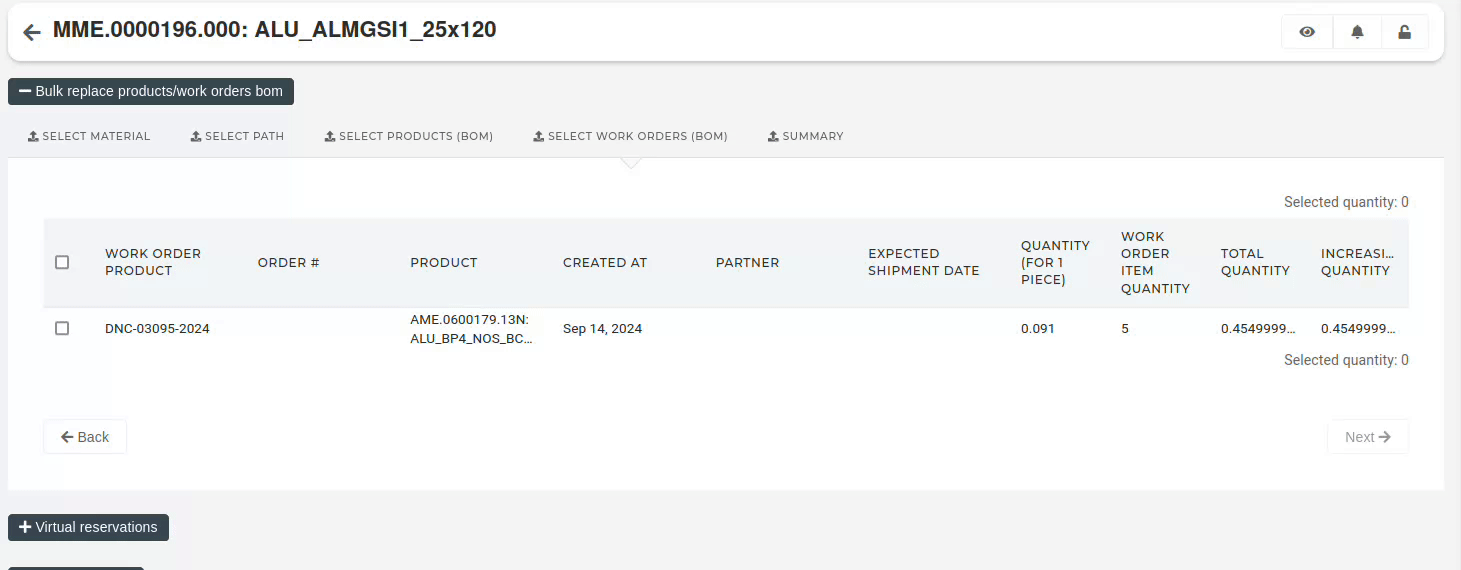
1. Select material
Select the product, that will replace the current product in BOMs, and set its quantity. There can be from one to several products selected to replace the current product.

2. Select path
Here you have to select which type of BOMs you will be updating (replacing the product in):
- Update product BOM: the product will be replaced in BOMs of selected products.
- Update work order BOM: the product will be replaced in BOMs of selected work orders.

3. Select products (BOM)
If the selected path was "Update product BOM", the next step is to select the products, whose BOMs will be updated.

4. Select work orders (BOM)
If the selected path was "Update work order BOM", the next step is to select work order(s), where work order item BOMs will be updated.
5. Summary
If we are updating the product BOM, the summary will list the products that will be updated. Clicking the "Remove material" button and confirming will perform the replacement/removal of material on selected products.
If we are updating a work order's BOM, the summary will list the products that will be updated.
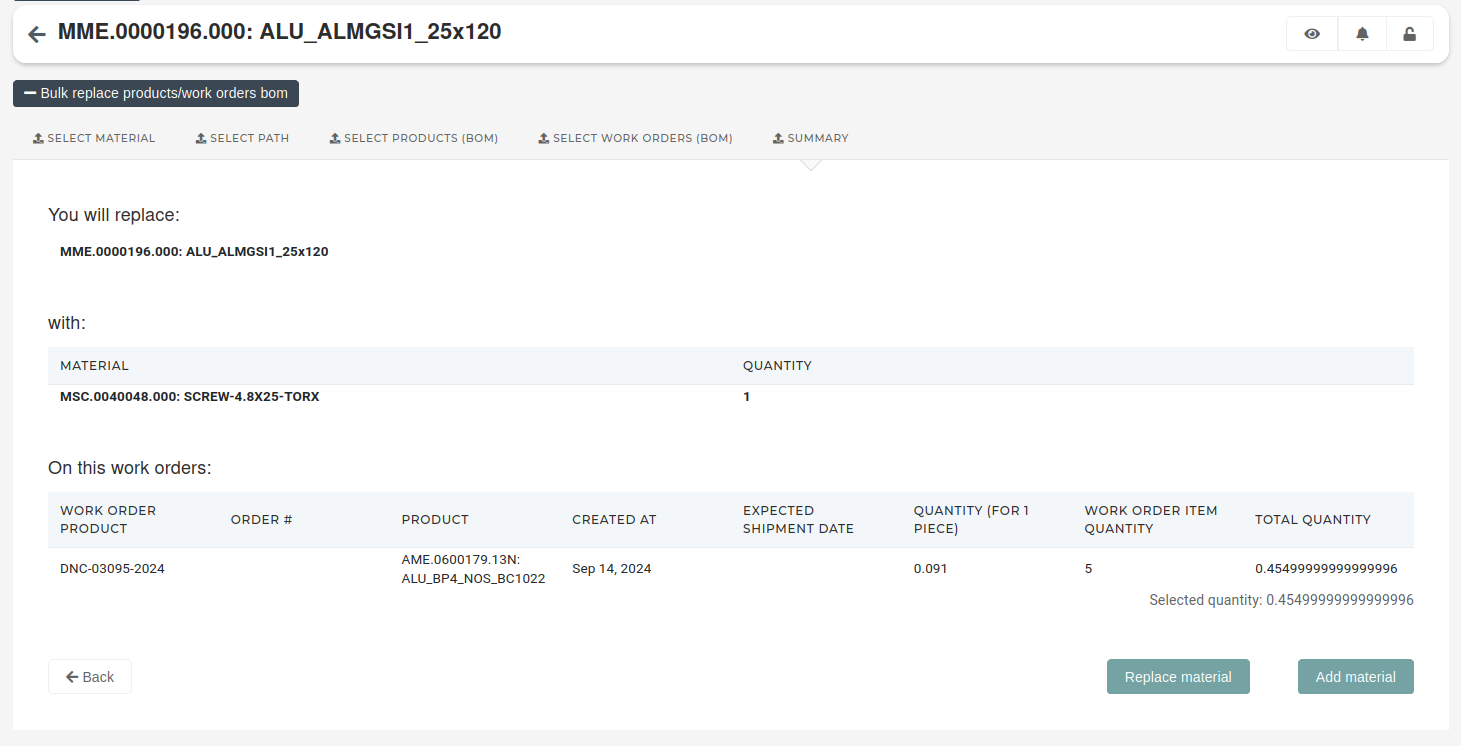
Clicking the "Replace material" button will replace material on BOMs of selected work order's items.
Clicking the "Add material" button will add material on BOMs of selected work order's items.
Product safety stock
wip
Product suppliers
wip
Bill of materials (BOM)
Steps
This can only work if produced assembly has tracking by serials!
The steps are designed for automatically generating actions on the consoles, including machine setup, a basic operation, and a measurement.
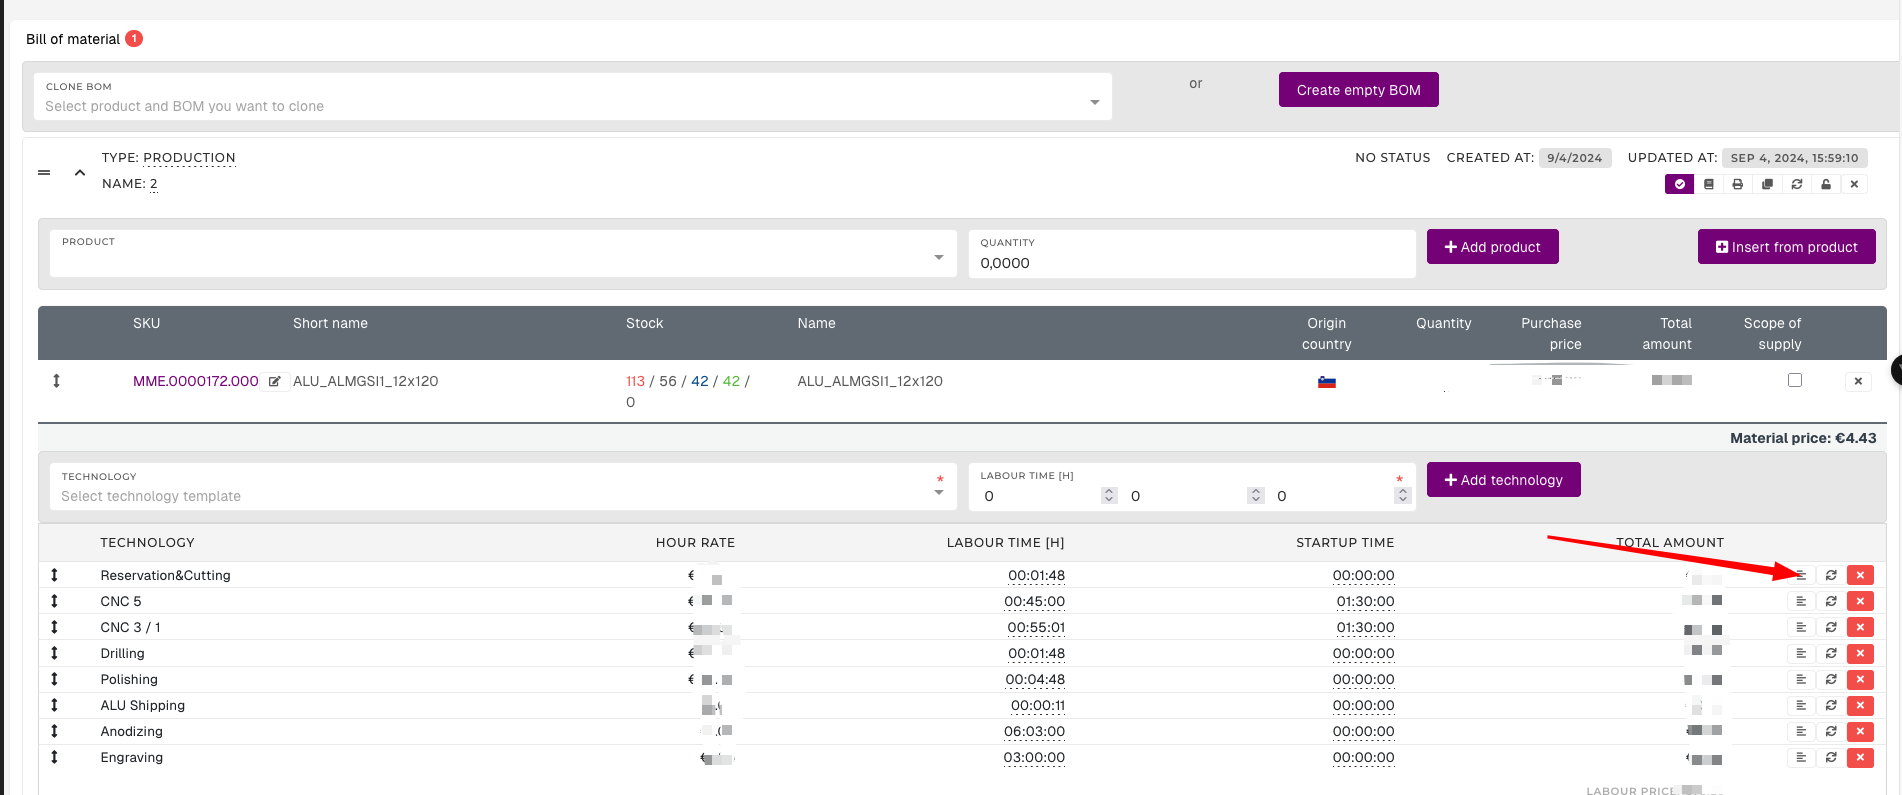
- Technology step: type of step (machine preparation, measurement, default operation) - these are codelist which can be updated here
- Start with: selected operation will start with n-th piece
- Repeat every: selected operation will repeat every n-th piece
- Is general step: selected operation will repeat for every serial
- Question/instruction: Description of the measure operator should make
- Nominal measure: Measure that should be measured
- Tolerance field max: Max value operator can measure
- Tolerance field min: Min value operator can measure
- Group: groups are meant for multiple passes for each technoogy. In CNC maching it could happen that you need to take out the piece and rotate it for CNC to finish

For developers:
When creating WO, this will generate serials steps which are then used in Console.
BOM presence
wip
Product lines
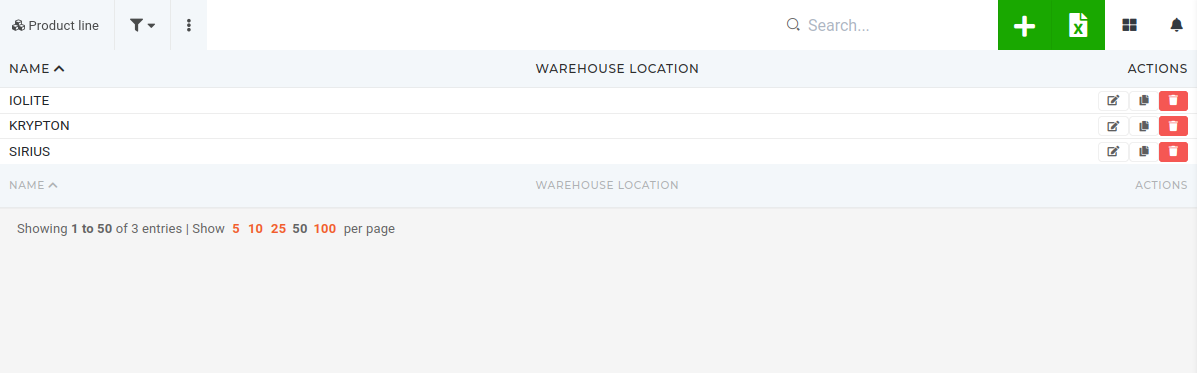
Overview
Product lines are used to group similar products into merchandise groups. Product lines provide default warehouse location, maximum and minimum required stock for all products, added to that particular product line.
Create new product line
To add a new product line, press the "Add new" button to get redirected to the "Add product line" form.
To create a new product line, all that is required is a unique product line name.

When adding a product into the product line, a default location for that product is required.
Update existing product line
Delete product line
Projects
Overview
Create new project
Update existing project
Delete project
Serial numbers
Overview
Serials are used within the ERP for tracking of devices.
Serial number is a sort of identification number of a particular device.
With the serial number, users can access calibration reports for a particular device. Serial numbers can also be used to track a particular product's stock transactions.

Serials are usually connected to a product and/or to a license.
Create new serials
This actions required the "create serial" permissions.
Adding a new serial through the ERP is usually not necessary, as new TBD serials are automaticaly generated for work orders and can simply be renamed.
Serials can be added via the ERP "Add new serial number" form.

When adding a new serial number into the system, only its serial number value is required.
When adding a new serial number, keep in mind that the system does not limit the adding of multiple serials with the same serial number. There can, however, not be more than a single serial with a particular serial number and a particular product type.

Update existing serials
Delete serials
This action requires the "delete serial" permission.
Serials should, in most cases, not be deleted. The only exceptions are duplicates of existing serials. This happens when serials are create through different sources without all information.
When this happens, both serials should be checked and their data synced (warranty, calibration intervals, file manager contents...)
After syncing all serial data, the serial with existing stock transactions should be retained, while the duplicate can be deleted.

Extend serial's warranty
By default, warranty is calculated automatically, based on fields on serials:

Conditions, that apply are (warranty enabled):
- if serial is not sold (this is necessary to show correct data in calibrator)
- if sold serials do not need calibrations (image below)
- if sold serials need calibration and are calibrated (last calibration is before current date and next calibration is after)
- if warranty is valid until the warranty due on serial number. This is generated from sales date to calculated date from product setting warranty duration in months (image below)

Warranty will turn off, when warranty due date passes or calibration was not done within N months from next calibration date (the N can be setup in ERP settings).
You can turn on warranty with warranty switch on serial's page. Be aware of automation explained in section below:
Warranty will turn off every night, if settings are not correctly set up (e.g. warranty due or next calibration is missing based on conditions above)
Calibration interval can be changed, if calibration is necessary more or less often. Zero mean 12 months.
Troubleshooting: duplicated serials
Occasionally, two serials with the same serial number are created in the ERP.

When this happens, the two serials must be compared. If one serial has some fields filled that the other does not, those fields have to be synced between the two serials.

Once all the information, present on the serials, is added on both serials, the "stock transactions" section has to be checked on both serials.

After all information has been synced, files in file manager should also be synced between the two serials, as files such as calibration reports, can pertain to either of the serials.
If, on inspection, one of the serials has stock transactions while the other does not, then the one without stock transactions can be deleted.

Troubleshooting: Find serial stock source
This action requires the "View serials", "View lots" and "View stock transactions" permissions.
A serial's stock source needs to be identified for a variety of stock operations.
Serial's stock source usually refers to Goods receipts, Goods rebooks or Stock adjustments...
To find a serial's stock source, open the serial's details page and find its "Lot" field. Click the link icon, this will redirect you to Lot's details page.

On the lot's details page, open the "Stock transactions" section, this will load all transactions of this lot. Scroll to the first stock transaction.
It is recommended to check the "Only In" checkbox and view transactions by their names to find the right goods receipt/rebook or stock adjustments. The stock transaction usually has a link to the stock document in the "Document no." column.

Fixed assets
Overview
Create new fixed asset
Update existing fixed asset
Delete fixed asset
This action can be performed by users with proper permissions.
A fixed asset can be deleted from the ""Fixed assets"" table view.
Find the fixed asset that you want to delete by searching for its inventory number in the table.

Once you have found the fixed asset, tick its checkbox, and click & confirm the "Trash" button that appears in the top right corner. With the fixed asset deleted, the goods receipt can now be canceled.

Licenses
Overview
Create new license
Update existing license
Delete license
Restore license
Problem description
Customer order upgrade and then cancel it.
Because we need license key as soon as the order is created, system automatically delete old license and create new one. To revert this process you need to follow next how to guide
Solution
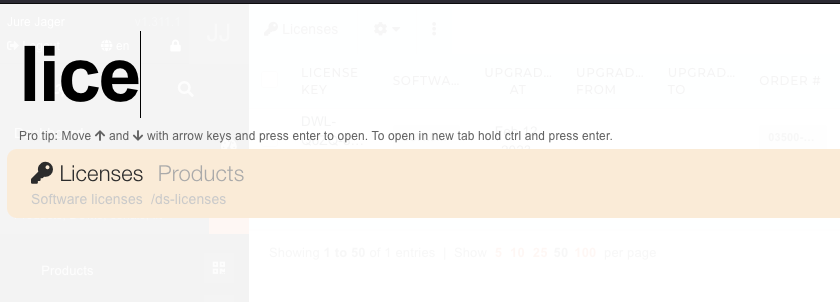
Go to licenses (CTRL+/ and search license):
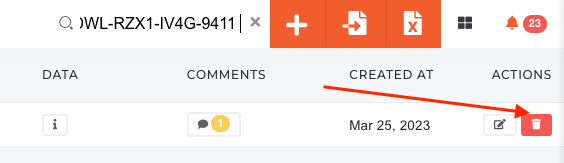
Find newly created license and delete it:
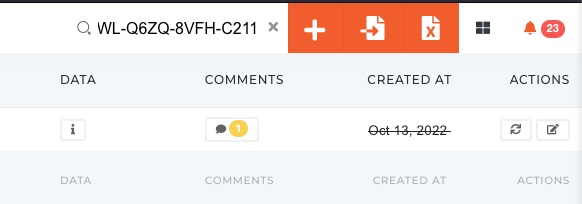
Find old license which needs to be restored:
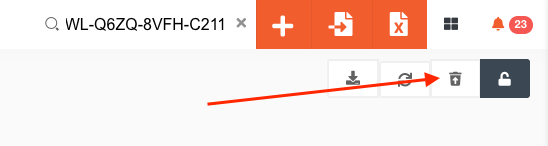
Open and restore it:
Create upgrade to, upgraded at and save it:

Downgrade license
Old license:
- copy sale order item id from new one
- change ds_licence_id on serial to old one
- remove deleted at on old license
- remove upgrade_ds_license_to_id
New license:
- remove upgrade_ds_license_from_id
- delete license with button