Users and permissions
Users
Overview
Users are the core of the ERP system. All non-system actions and tasks are performed by users with proper permissions.

Create a new user
This action requires the "Create user" permission.
To create a new user, click the "+" button in the top right corner above the table. You will be redirected to the "Add new user" form.
To create a new user, you need at least:
- A unique email address that is not yet assigned to any user.
- The user's first name and last name.
- The user must be confirmed in order to be able to access the ERP.

Update an existing user
This action requires the "Update users" permission.
Updating the user is done by finding the user in the "Users" table and its clicking "Edit" icon.
![]()
This redirects you to the user's edit page, where you can update most of the user's basic information (photo, name, address, authorization, contact information...) or send a "Password reset" email to user.

Delete user(s)
This action requires the "Delete users" permission.
Roles
Overview
Roles are used in the ERP system to determine user's role in the company.
Roles are used to group sets of permissions, that are required for performing a task or general ERP use.

Create a new role
To create a new role, click the "+" button above the "Roles" table, to navigate to the "Create new authorization role" form.
![]()
On the form, fill out the required fields and click save to add a new role.

- Name
- Select a descriptive name for the role (eg. a work position, like Department Lead)
- Select a descriptive name for the role (eg. a work position, like Department Lead)
- Slug
- Is used to identify the role throughout the ERP. Is usually formatted role name (eg. department-lead)
- Is used to identify the role throughout the ERP. Is usually formatted role name (eg. department-lead)
- Level
- A role's level is used to determine it's priority over other roles. Roles with higher priority overrule roles with lower levels.
- A role's level is used to determine it's priority over other roles. Roles with higher priority overrule roles with lower levels.
- Description
- Is not required, but it's highly encouraged that it be added. Used to further explain the roles purpose.
- Is not required, but it's highly encouraged that it be added. Used to further explain the roles purpose.
- Permissions
- Select, which permissions are attached to this role.
- Select, which permissions are attached to this role.
- Users
-
- You can list users, that will have this role here, and it will be assigned to them automatically after role is created.
- You can list users, that will have this role here, and it will be assigned to them automatically after role is created.
Update an existing role
Roles should be updated only be people, who know their purpose, as deleting a role that is required for a certain tasks will stop users form performing those tasks.
To edit an existing role, find it in the roles table and click on its "Edit" button.

On the role's page, you can update its name and description, its assigned permissions and manage users, that have this role.
It is not recommended to update a role's slug, as it may be used for programmatic access control.

Delete role(s)
Roles should only be deleted by people, who understand the role's purpose and know it's uses.
To delete a role, find it in the "Roles" table and tick its checkbox. Then click and confirm the "Trash" button, that appears above the table.
Permissions
Overview
Permissions are used to limit and provide access for users within the ERP system.
TIP: Permissions can be assigned onto roles or onto users directly, although this is discouraged, as roles provide easier trackability of what user has what permissions..

š
Create a new permission
To create a new permission, navigate to the "Add new authorization permission" form by clicking the "+" button in the top right above the table or by visiting the "Add new permission form" directly.
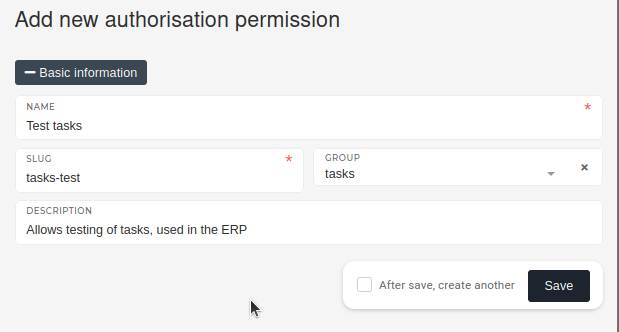
When creating a new permission, a unique name is required, alongside a corresponding permission slug. The slug is how the permission will be called during checks.

Defining the group that the permission belongs to, is not necessary but is encouraged, as it makes it easier to find the new permission while searching for it.
TIP: Description is not strictly required, but should be added when possible, to describe what the permission is used for.
Update an existing permission
Permissions should be updated only be people, who know their purpose, as permissions are used to grant access to a parts of the ERP .
To edit an existing permission, find it in the permissions table and click on its "Edit" button.
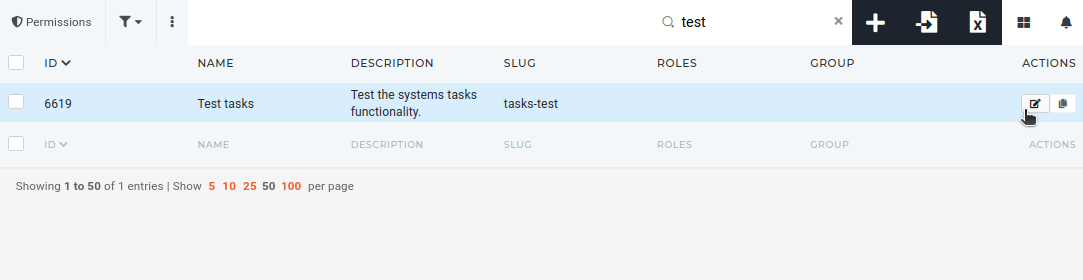
On the permission's page, you can update its name, description and group, that's used to show grouped permissions in permissions section on user and role page.
It is not recommended to update a permission's slug, as it may be used for programmatic access control.

Delete permission(s)
Permissions should only be deleted by people, who understand their purpose and know the permission's uses.
To delete a permission, find it in the "Permissions" table and tick its checkbox. Then click and confirm the "Trash" button, that appears above the table.
