Warehouses

Goods transfers

Goods transfers

Overview

Goods transfers provide an easy way to transfer products (goods) between warehouses and warehouse locations within the ERP. 

Goods transfers allow users to quickly and efficiently perform movements of inventory, ensuring accurate tracking of stock and maintaining real-time visibility across all warehouse locations.

image.png

Goods transfers can be initiated for various purposes, such as restocking, fulfilling production requirements, reserving material for work orders or reallocating inventory to meet demand. The system supports detailed documentation of these transfers, including quantities, transferred items, source and destination warehouse locations and a short description, ensuring transparency and intuitive trackability in conjunction with stock transactions.

Goods transfers

Create new goods transfer

Goods transfers

Update existing goods transfer

This action requires the "Update goods transfer" permission.

Goods transfers should generally not be edited/updated, because their data is directly tied to stock transactions, which are critical for tracking, validating and maintaining accurate stock levels. 

Descriptions of goods transfers can be changed, but all other information should not be updated.

image.png

Altering goods transfers can disrupt the integrity of inventory records and lead to discrepancies in stock validation processes. To ensure consistency and compliance, any changes to stock movements should be managed through proper adjustment or reversal procedures rather than editing existing transfer records.

Goods transfers

Delete goods transfer

This action requires the "Delete goods transfer" permission.

Goods transfers cannot be deleted directly, due to the stock transactions that are connected to them. Because of this, goods transfers need to be canceled first.

Goods transfers with no stock transactions, such as "Failed" transfers, can be deleted without being canceled first.

Once a goods transfer is "canceled" and there are no existing stock transactions tied to it, it can be deleted from the table.

output.gif

Goods transfers

Cancel goods transfer

This action requires the "Cancel goods transfers" permission.

Goods transfers cannot be deleted directly, due to the stock transactions that are connected to them. Instead, they need to be "canceled" first. 

When canceling a goods transfer, make sure that it is the last transfer to/from the source location (last transaction in the lot). Trying to cancel a goods transfer that is not last will result in an error being shown.

image.png

To cancel a goods transfer, go to the details page of goods transfer and open the "Danger zone" section. 

image.png

You will see a button, labeled as "Cancel". Click and confirm the button to cancel the goods transfer. This will rollback any changes to the stock, done by the goods transfer, as well as delete any stock transactions, tied to this goods transfer. 

After the process in finished, the status of the goods transfer will then be updated to "Canceled".

output.gif

When goods transfer cannot be cancelled (i.e. the error "Transactions exist after this goods transfer." appears), that usually means a transaction after this transfer has been created for one of the items on this transfer. To find the problematic item, list all items in the "Goods transfer Items" table and open every item's Lot

image.png

On the "Lot" page, open "Stock transactions" section, and check the "Show goods transfers" checkbox. All transactions, created after your goods transfer, are the reason, why the goods transfer cannot be canceled.

output.gif

Goods rebooks

Goods rebooks

Overview

Products can be converted into other products by "rebooking" them with goods rebooks.

Goods rebooks are used to correct or adjust inventory records to address discrepancies or changes in stock management while preserving data integrity.

Goods rebooks are commonly used to fix errors in inventory transactions, such as incorrect quantities or item codes, recorded during goods receipts or stock movements. Goods rebooks also enable the reallocation of inventory between locations, warehouses, or categories, such as reclassifying damaged goods or quality-assured stock. 

image.png

Additionally, they help align physical stock with financial records during audits, ensuring accurate inventory valuation. Rebooks are essential for reclassifying items due to changes in usability, such as converting defective goods into scrap or changing purchased work equipment into fixed assets. 

Most common use for goods rebooks is to rebook goods between different product codes (SKU-s). But not all product types can be rebooked to all other product types. This is managed through the "rebook matrix".

Goods rebooks

Create new goods rebook

This action requires the "Create goods rebook" permission.

New goods rebooks can be created in the "Create new goods rebook" form, or by clicking the "+" button above the "Goods rebooks" table.

output.gif

To create a rebook, a description is required.

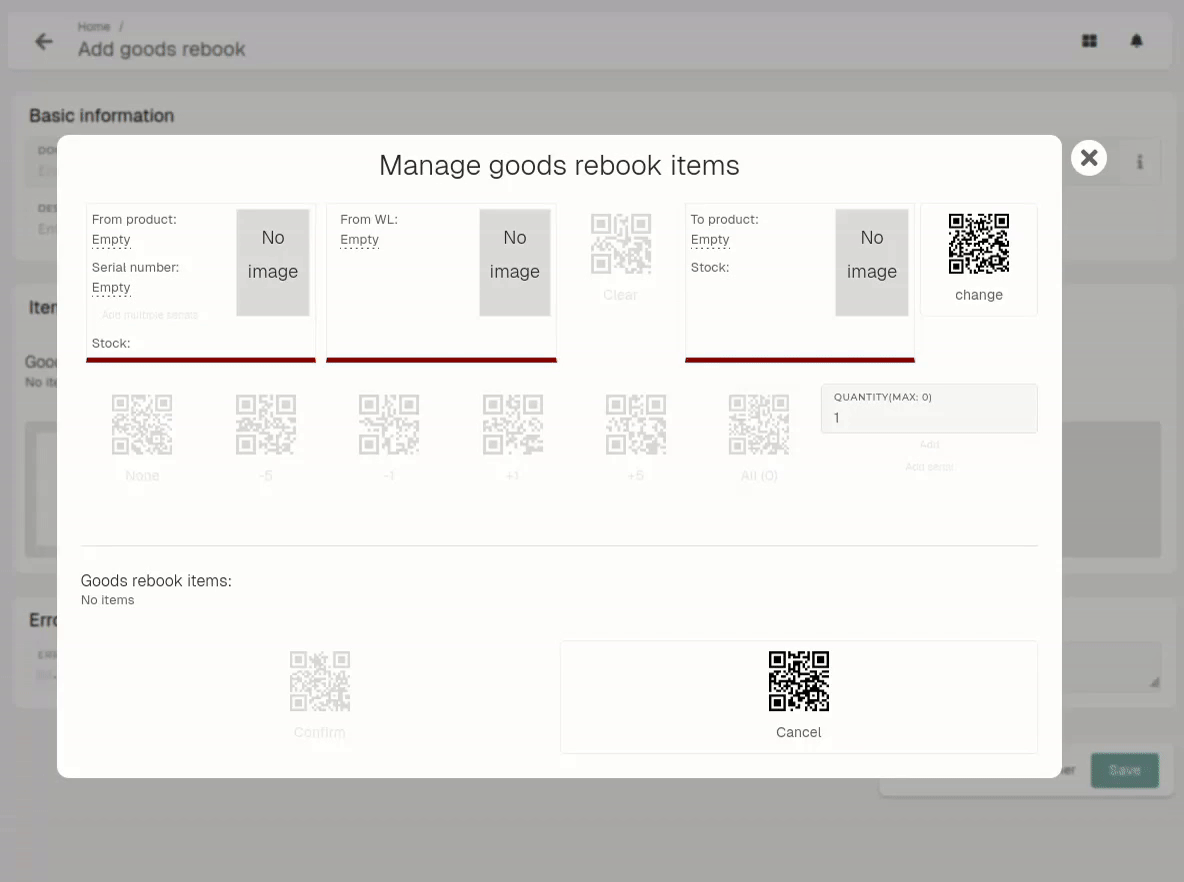
To add product(s) for rebooking, click/scan the "Manage goods rebook items" button. 

output.gif

Select the product, whose stock you want to rebook (From product) and the product, which the stock should be rebooked to (To product).

Selecting the warehouse location of the stock that will be rebooked is also required. Once the "From product" is selected, a list of warehouse locations with stock appears.

If "From product" has stock tracking by enabled, serials need to be selected.

With the current and target product selected, enter rebook quantity, how much of source product's stock to rebook. With all data entered, click/scan the "Confirm" button, an

output.gif

When doing a goods rebook, keep in mind that not every product can be rebooked into every other product. Rebookability is managed through the rebook matrix, which determines which product types can be rebooked in to which other product types.

Goods rebooks

Update existing goods rebook

This action requires the "Update goods rebook" permission.

Goods rebooks are generally not editable, because their data is directly tied to stock transactions, which are critical for tracking, validating and maintaining accurate stock levels. 

Descriptions of goods rebooks can be changed, but all other information (e.g. status, items,...) is locked.

image.png

Altering goods rebooks can disrupt the integrity of inventory records and lead to discrepancies in stock validation processes. To ensure consistency and compliance, any changes to stock should be managed through proper adjustment or reversal procedures rather than editing existing records.

Goods rebooks

Delete goods rebook

This action requires the "Delete goods rebook" permission.

Goods rebooks cannot be deleted directly, due to the stock transactions that are connected to them. Because of this, goods rebooks need to be canceled first.

Goods rebooks with no stock transactions, such as "Failed" rebooks, can be deleted without being canceled first.

Once a goods rebook is "canceled" and there are no existing stock transactions tied to it, it can be deleted from the table.

output.gif

Goods rebooks

Cancel goods rebooks

This action requires the "Cancel goods rebook" permission.

Goods rebooks cannot be deleted directly, due to the stock transactions that are connected to them. Instead, they need to be "canceled" first. 

When canceling a goods rebook, make sure that it is the last transaction in product's lot. Trying to cancel a goods rebook, that is not last, will result in an error being shown.

image.png

To cancel a goods rebook, go to the details page of the goods rebook and open the "Danger zone" section. 

image.png

You will see a button, labeled as "Cancel". Click and confirm the button to cancel the goods rebook. This will rollback any changes to the stock, done by the goods rebook, as well as delete any stock transactions, tied to this goods rebook. 

After the process in finished, the status of the goods rebook will then be updated to "Canceled".

image.png

When goods rebook cannot be cancelled (i.e. the error "Transactions exist after this goods rebook." appears), that usually means a transaction after this rebook has been created for one of the items on this rebook. To find the problematic item, list all items in the "Goods rebook Items" table and open every item's Lot (Lot ID)

image.png

On the "Lot" page, open "Stock transactions" section, and check the "Show goods transfers" checkbox. All transactions, created after your goods goods rebook, are the reason, why the goods rebook cannot be canceled.

output.gif

Goods rebook items

Goods writeoffs

Goods writeoffs

Overview

Goods writeoffs

Create new goods writeoff

Goods writeoffs

Update existing goods writeoff

This action requires the "Update goods writeoff" permission.

Goods writeoffs are generally not editable, because their data is directly tied to stock transactions, which are critical for tracking, validating and maintaining accurate stock levels. 

Descriptions of goods writeoffs can be changed, but all other information (e.g. status, items,...) is locked.

image.png

Altering goods writeoffs can disrupt the integrity of inventory records and lead to discrepancies in stock validation processes. To ensure consistency and compliance, any changes to stock should be managed through proper adjustment or reversal procedures rather than editing existing records.

Goods writeoffs

Updating booking date on goods writeoffs

This can only be done by users with permission to update goods writeoffs.

To update booking date on goods writeoff, click the "calendar" icon in the "booking date" field.

Screenshot from 2024-04-24 11-05-21.jpg

A calendar will appear, that provides an easy way to set a new date. Once the booking date has been updated, save the goods writeoff.

image.png

If you get an error, refer to the section below.

If you get an error like the one below after saving the goods writeoff, there are transactions on the serial(s), connected to the goods writeoff item(s), preventing updating.

Cannot change date booked to 2024-03-29 00:00:00. Transactions exists after that date.

image.png

When transactions after the new booking date exist, that means those transactions have to be updated as well.

To find all (serial) transactions  after the new booking date, go to the page of the serial, linked to the goods writeoff item, and open the "stock transactions" section. 

Here, tick the "show transfers" checkbox. Transactions are sorted by the date of creation.

image.png

Look through the transactions and open goods transfers (GTR), created after the new goods writeoff booking date.

Screenshot from 2024-04-24 12-14-22(1).jpg

Open every goods transfer, that was made after the new goods writeoff booking date and update their "booking date" field to the new booking date.

image.png

Once all goods transfers have new dates that are not set after the new writeoff date, update the date on the writeoff ans save again.

Screenshot from 2024-04-24 11-05-21.jpg

Goods writeoffs

Delete goods writeoff

Goods writeoffs

Cancel goods writeoff

Warehouses

Warehouses

Overview

Warehouses are used to represent larger in-company locations (eg. material storage...), that are split into warehouse locations, where goods (products, materials, equipment... ) are moved after being received , transferred or written-off.

Warehouses are used to represent larger locations (eg. office floors) that are then populated with warehouse locations (eg. offices).

image.png

Warehouses

Create new warehouse

This action requires the "create warehouse" permission.

New warehouses can be created in the "Create new warehouse" form, that can be accessed here, or by clicking the "+" button above the "Warehouses" table.

output.gif

Basic information

The create form requires two main pieces of information. The name of the warehouse, that will be used to identify it, and a general description, to inform anyone viewing the warehouse to its purpose (eg. new material warehouse, main office...)

image.png

Settings

The "Settings" section is used to decide the purpose of the warehouse and how it can be used in the ERP.

image.png

Production supply

Production

Waste

Transit

Can receive goods

Promo supply

Order requirements supply

Requirements supply

Planner supply

This is warehouse wall

Warehouses

Update existing warehouse

This action requires the "update warehouse" permission.

The warehouses update page enables making changes to warehouse information after creation.

The warehouses name and description can be changed at any time with no conflicts.

Changing values in the "Settings" section requires some consideration, as updating these settings can alter, how the system uses the warehouse.

image.png

The update page also displays "stock statistics", providing a quick overview of product or material stocks in the warehouse, as well as a display of stocks by warehouse's warehouse locations and a list of stock transactions, linked to them.

image.png

Warehouses

Delete warehouse

This action requires the "delete warehouse" permission.

A warehouse can only be deleted, if there are no stock transactions, linked to warehouse locations in that warehouse or if there are no warehouse locations on that warehouse at all. Otherwise, the deletion will fail and the "System error" message will be shown.

Warehouses should be deleted only if it is necessary.

output.gif

Warehouse locations

Warehouse locations

Overview

Warehouse locations in the ERP represent locations around the company, from actual warehouses and offices to employee's desks.

Every employee should have their own warehouse location, that is used to show items in that employee's possession.

Products (materials, equipment...) can be received to and transferred between these warehouse locations. Warehouse locations are also used to calculate material stock by location.

image.png

Warehouse locations

Create new warehouse location

This action requires the "create warehouse locations" permission.

New warehouse locations can be created in the "Create new warehouse location" form, that can be accessed here, or by clicking the "+" button above the "Warehouse locations" table.

output.gif

Basic information

The create form requires two main pieces of information. The warehouse, where the warehouse location is located, and a warehouse location name, to differentiate it from other locations within the same warehouse.

image.png

Description, default product line and status are optional.

Warehouse locations

Update existing warehoues locations

This action requires the "update warehouse locations" permission.

The warehouse location's name, description or product line can be changed at any time with no conflicts.

Warehouse location's warehouse can be updated, but should be done carefully, as changing the warehouse may impact, how the warehouse location behaves (due to possible differences in warehouse settings).

image.png

A warehouse location's status can be set to obsolete, when the location is no longer "in use".

Warehouse locations

Delete warehouse locations

This action requires the "delete warehouse locations" permission.

A warehouse location can only be deleted, if there are no stock transactions (receipts, transfers...), linked to it, otherwise, the deletion will fail and the "System error" message will be shown.

output.gif

Instead of deleting, a warehouse location's status can be set as "Obsolete". This removes a warehouse location from active use, preserving it only for stock transaction history.

output.gif

Stock taking

Stock taking reports

Stock taking adjustments

Stock taking adjustment items

Stock

Stock

Overview

Stock

Managing negative stock

In the stock page, product stock with negative values can be managed (i.e. nullified).

This method should only be used when no other method of stock management can resolve negative stock.

In the "Drill down by" section, select Warehouse location, Product, Work Order and Lot. Serial numbers should also be included.

image.png

Once columns and includes are selected, click "Apply filters". Once the table with selected data loads, sort it by "Quantity", sorting ascending (^ Quantity).

image.png

After the sorted table is loaded, tick the checkbox for all products with negative stock, that you want to nullify.

When products are selected, the "Make stock adjustment for checked items" button appears under the table.

output.gif

The button opens a tooltip, where you can create a bulk stock adjustment for all selected products (product lots).

image.png

Note that this only creates the stock adjustment. Booking can also be done automatically, by ticking the "Also book" checkbox, but checking items of the stock adjustment before booking is strongly recommended.

Find the newly created stock adjustment in the "Stock adjustments" table. It should be the last record, created, with a status of "New".

image.png

After the items have been checked (to make sure that correct stock values are being adjusted), clikc "Book to stock" to book the stock adjustment. 

image.png

A successful stock adjustment will go from "New" to "Booked", after the booking process is done.


Stock movement

Obsolete stock report

Obsolete stock report

Report

At the beginning of each year, we generate an obsolete inventory report for the previous year. Each report is associated with a specific year. For example, if the report is generated at the start of 2026, it will be recorded as the report for 2025.

Reports from previous years remain unchanged and are preserved as historical records.

When viewing a report, the displayed data is interpreted relative to the current year.

How to read the inventory report

  1. If inventory has a 2–3 year value, but part of it was used during the previous year, only the remaining difference is considered for the inventory write-down, calculated at 75%.
  2. If there is a 2–3 year value and no movement occurred during the year, the entire value is subject to a 75% inventory write-down.


image.png

Stock initials

Stock initials

Initial stock

To insert initial stock in menu select Warehouses -> Stock initials -> button + on the right top side

image.png

  1. Select Stock initial
  2. Find and select product/material/reselling
  3. Select warehouse location
  4. Quantity (if serials, quantity needs to match number of serials inserted later)
  5. Amount per piece
  6. If product/material/reselling is tracked by serials, you need to insert them here